
TriggerApp
☕ Support this project
Currently, I have no consistent income. If you find this library useful in your business or daily tasks, your donation would make my life a little easier and heavily support the continuous maintenance of this project. Donate via PayPal
Overview
This is a Google Apps Script library for efficiently managing the time-driven triggers for executing Google Apps Script using Google Apps Script.
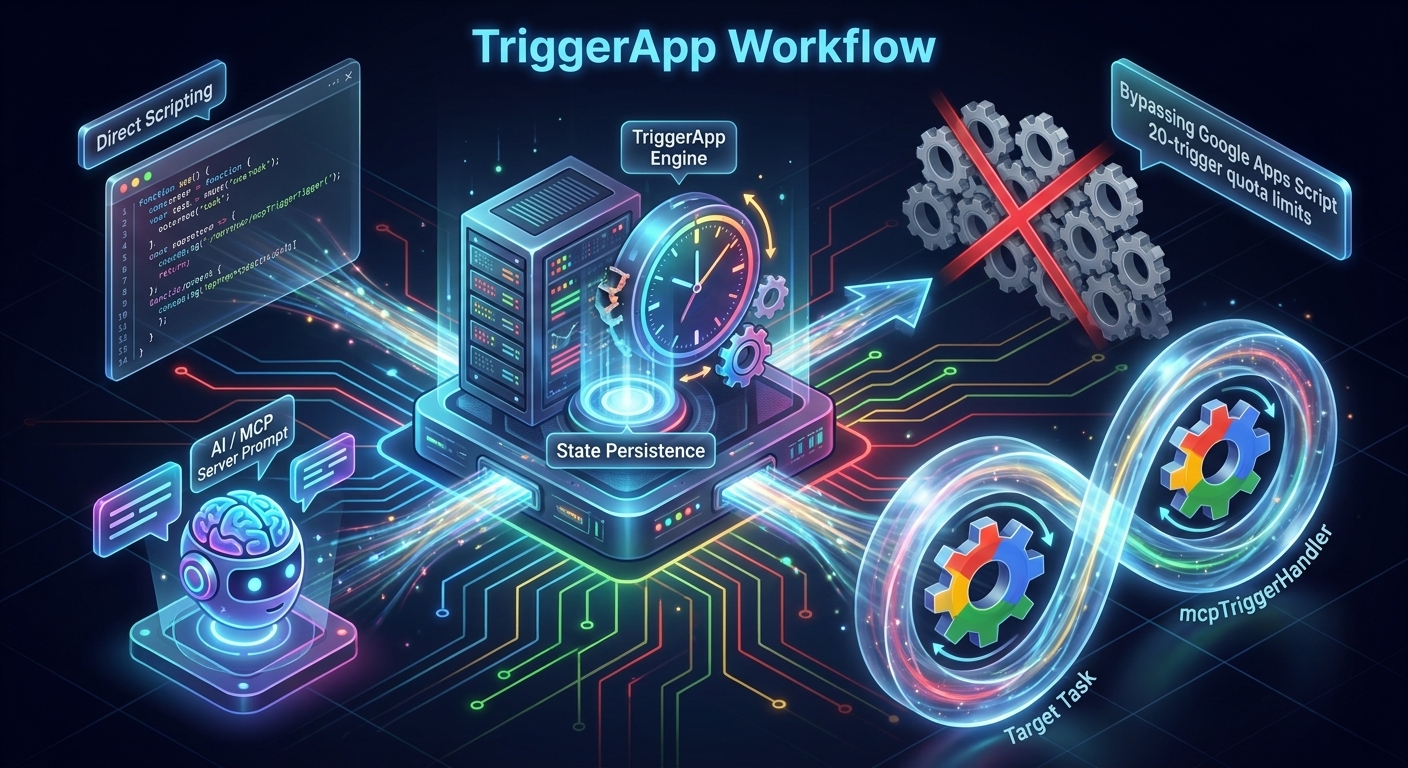
🔥 [NEW in v2.0.8+] MCP Autonomous Server Architecture: TriggerApp can now operate entirely as a Model Context Protocol (MCP) Server. This allows Generative AI Agents to autonomously install, retrieve, simulate, and delete your Google Apps Script time-driven triggers through natural language prompts. It includes an embedded, completely isolated state-persistence mechanism, freeing AI agents from complex recursive handler definitions without compromising your project's security scope.
Description
Google Apps Script can execute with not only the manual operation but also several triggers. The time-driven trigger is one of them, and this is one of a lot of important functions. When the time-driven trigger is used, Google Apps Script can be automatically executed at the time you set without launching the user's PC.
There are various situations for using time-driven triggers. And, I thought that when I created each script for each situation, the script might tend to be complicated. Ref and Ref Actually, when I prepared the scripts for each situation in my work, I thought that each script was largely different. I have wished a logic for integrating time-driven triggers for Google Apps Script were existing. Unfortunately, I couldn't find the algorithm for efficiently managing the time-driven triggers for various situations before.
Fortunately, a while ago, I came up with an algorithm using one object. I think that the basic algorithm has been used for a very long time. But, I couldn't find the logic for adapting to various situations using one object. Because, when I started developing a script using this logic, I thought that the script will be much more complicated. Through this, I created this library.
However, I'm worried that the library using this algorithm can be actually used for various situations. So, I have tested various situations with my actual work using this library by taking time. From this test, it was found that it is very useful. So, I would like to publish this library because I believe that this will be useful for a lot of users. This library can efficiently manage time-driven triggers for executing Google Apps Script in various situations with a simple script. If this is useful for your situation, I'm glad.
Algorithm of this library
The algorithm of this library is straightforward. An important point of this algorithm is to use one object for managing various trigger tasks. In order to explain this, the trigger process shown in the following figure is used.

This figure shows the trigger process. For example, when "00:00" is "00:00" of "2024-01-01", "workFunction1", "workFunction2", and "workFunction3" are run as follows.
- "workFunction1": "2024-01-01T00:00:00", "2024-01-01T06:00:00"
- "workFunction2": "2024-01-01T00:30:00",,, "2024-01-01T02:30:00", and "2024-01-01T03:30:00",,, "2024-01-01T05:30:00", and "2024-01-01T06:30:00",,, "2024-01-01T08:30:00".
- "workFunction3": "2024-01-01T03:00:00", "2024-01-01T09:00:00"
When this process is run, I thought that if only the next trigger time for the current time is set by giving one object, the script might be able to be used. When the above image is used,
- When the current date time is "2023-12-31T23:00:00", the following trigger time is "2024-01-01T00:00:00" with "workFunction1".
- When the current date time is "2024-01-01T00:00:00", the following trigger time is "2024-01-01T00:30:00" with "workFunction2".
- This is repeated to the last task.
- When the current date time is "2024-01-01T09:00:00", no next trigger is installed.
In the above flow, this process can be achieved even with only 2 time-driven triggers. Actually, I tested this logic many times, and I could obtain that this can be used. This algorithm can achieve various triggers by installing only 2 time-driven triggers.
🧠 Deep Dive: The mcpTriggerHandler Architecture & Workflow
Google Apps Script enforces strict quotas, typically limiting active project triggers to 20 per user/script. If you attempted to create hundreds of physical triggers for complex intervals, your project would immediately crash.
TriggerApp bypasses this limitation using a Daisy-Chain (Recursive Scheduling) Algorithm. When utilizing TriggerApp—especially via the MCP Server or dedicated handler patterns—you will notice a function named mcpTriggerHandler constantly appearing in your active triggers list.
What is mcpTriggerHandler?
It is the heart of TriggerApp's infinite loop mechanics. It acts as the Recursive Orchestrator. Instead of registering infinite triggers, TriggerApp registers exactly two physical triggers at a time:
- One for your actual business logic function (
myTask). - One for the
mcpTriggerHandler(scheduled slightly after your task).
When mcpTriggerHandler fires, it autonomously reads your persisted configurations from PropertiesService, calculates the absolute next execution time mathematically, and reinstalls the next two triggers.
⚠️ CRITICAL WARNING: Do NOT manually delete mcpTriggerHandler from your GAS Triggers dashboard. If you delete it, the recursive chain is broken, and your automated tasks will halt indefinitely after their next execution.
Architecture Flow Diagram
The following Mermaid sequence diagram visualizes exactly how user intents (via AI) are mapped through mcpTriggerHandler to bypass quotas safely:
sequenceDiagram
    autonumber
    actor User as User / AI Agent
    participant MCP as MCP Server / Web App
    participant TA as TriggerApp (Core)
    participant Prop as PropertiesService
    participant GAS as GAS Time-Driven Triggers
    participant Task as Target Function (e.g., myTask)
    participant Handler as mcpTriggerHandler

    User->>MCP: Request: "Run myTask every day at 09:00"
    MCP->>TA: mcp({ ... }) -> Calls install_triggers
    TA->>Prop: Persists trigger configuration as JSON
    TA->>GAS: Installs Trigger 1: myTask (Executes at 09:00)
    TA->>GAS: Installs Trigger 2: mcpTriggerHandler (Executes at 09:01)

    Note over GAS: ... Time passes until execution ...

    GAS->>Task: Executes Trigger 1 (myTask)
    Note right of Task: User's business logic runs

    GAS->>Handler: Executes Trigger 2 (mcpTriggerHandler)
    Handler->>TA: executeMcpTriggers(e, properties)
    TA->>Prop: Reads persisted JSON configuration
    TA->>TA: Calculates next scheduled execution time
    TA->>GAS: Installs Next Trigger 1: myTask (Tomorrow 09:00)
    TA->>GAS: Installs Next Trigger 2: mcpTriggerHandler (Tomorrow 09:01)
    Note over TA, GAS: The infinite recursive loop is established
Limitations
- The time-driven trigger follows "Current limitations of Quotas for Google Services". Ref
- When
toDayis not used, the trigger cycle is repeated to infinity. But., when an error occurs on the internal Google side for some reason, the trigger is stopped. At that time, please run the main function, again. By this, the trigger process is restarted. - In this library, I set the minimum interval between triggers as 60 seconds. Because, in the current stage, when the minimum interval time is less than 60 seconds, the time-driven trigger cannot be installed by the function executed by the time-driven trigger. I would like to believe that this situation might be resolved in the future update.
- When I tested the time-driven triggers many times using this library, for example, even when the function is trying to execute at "00:00:00", at least, the script is run after "00:00:00" like "00:00:10". It seems that the function was not executed before "00:00:00". But, there were cases where the function is executed at "00:01:30". I guessed that the reason for this issue is due to the Google side. This might be also a limitation.
- I'm not sure whether this has to be included in the "Limitations" section. When you want to execute functions using the "everyYear" property, I'm worried that when it occurs no execution of the script for a long time in the Google Apps Script project, it might be required to reauthorize the scopes. But, in the current stage, I have no experience with this issue. If you got it, please tell me. I believe that it will be useful for other users.
- I believe that this library will be able to adapt to a lot of scenarios for using time-driven triggers. However, on the other hand, I think that this library cannot be used in all scenarios. Please be careful about this.
Library's project key
1LihDPPHWBCcadYVBI3oZ4vOt7XqlowoHyBLdaDgRIx_5OpRBREA7Z1QB
Usage
1. Install library
In order to use this library, please install the library as follows.
-
Create a GAS project.
- You can use this library for the GAS project of both the standalone and container-bound script types.
-
- Library's project key is
1LihDPPHWBCcadYVBI3oZ4vOt7XqlowoHyBLdaDgRIx_5OpRBREA7Z1QB.
- Library's project key is
2. Setup as an Autonomous MCP Server (Generative AI Integration)
TriggerApp (v2.1+) bundles a native MCP Server with State Persistence. By deploying it as a Web App, you can empower AI Agents to interact with your Google Apps Script triggers intelligently. The AI doesn't need to understand complex daisy-chained triggers; it simply states what function to run and when.
Step-by-Step Deployment
Step 1: Write the client boilerplate code
In your Google Apps Script project, paste the following required code block. This handles the MCP web route and defines the global mcpTriggerHandler for recursive autonomy. Notice that PropertiesService.getScriptProperties() is injected to ensure your configuration is saved locally to your script and not leaked.
// Exposes the MCP server logic to incoming web requests
const doPost = (e) => {
  return TriggerApp.mcp({
    e: e,
    accessKey: "my_super_secret_key", // Security key for MCP access
    log: true, // Set to true to automatically save raw request payloads and standard logs
    spreadsheetId: "YOUR_SHEET_ID", // Required if log is true
    lock: LockService.getScriptLock(),
    properties: PropertiesService.getScriptProperties(), // MANDATORY: Preserves trigger scope isolation
  });
};

// MANDATORY: Global handler enabling LLMs to build infinite triggers
function mcpTriggerHandler(e) {
  TriggerApp.executeMcpTriggers(e, PropertiesService.getScriptProperties());
}

// Add the functions you want the AI to trigger below:
function myTask1() {
  console.log("myTask1: Executed perfectly on schedule!");
  // Optional: Append execution timestamp to your sheet to verify autonomous runs
  // SpreadsheetApp.openById("YOUR_SHEET_ID").getSheetByName("test").appendRow([new Date(), "myTask1"]);
}

function myTask2() {
  console.log("myTask2: Executed perfectly on schedule!");
  // Optional: Append execution timestamp to your sheet to verify autonomous runs
  // SpreadsheetApp.openById("YOUR_SHEET_ID").getSheetByName("test").appendRow([new Date(), "myTask2"]);
}
Step 2: Deploy as a Web App
- Click the Deploy button at the top right of the GAS editor, then select New deployment.
- Click the gear icon and select Web app.
- Under Execute as, select Me.
- Under Who has access, select Anyone.
- Click Deploy and copy the generated Web App URL.
⚠️ Security Notice: Because the Web App must be deployed with the "Anyone" setting for the external MCP client to reach it, it is openly exposed to the internet. You must define a strong
accessKeyin your script. Without the correctaccessKeyin the URL parameter, TriggerApp rejects all incoming unauthorized requests.
Step 3: Configure your MCP Client (e.g., Antigravity CLI)
Pass the copied Web App URL to your MCP configuration file, making sure to append your accessKey as a URL query parameter.
~/.gemini/antigravity/mcp_config.json
{
  "mcpServers": {
    "set-trigge-test-project1": {
      "serverUrl": "https://script.google.com/macros/s/{your_deployment_ID}/exec?accessKey=my_super_secret_key"
    }
  }
}
Now, you can jump to the AI Prompts section below and start controlling your App Script natively using the exact functions (myTask1, myTask2) defined in your script.
The MCP server named set-trigge-test-project1 manages time-driven triggers for a specific Google Apps Script project. Therefore, if you want to manage triggers across multiple Google Apps Script projects, you must deploy the MCP server as a Web App. This follows the specification at the Google side.
🤖 Generative AI Prompts (MCP Integration)
When connected as an MCP server, you can use these natural language prompts with your AI (like Claude or Gemini) to completely control TriggerApp without writing any code. The AI will utilize the mapped tools comprehensively based on the myTask1 and myTask2 functions provided in the sample script.
1. Getting Information (Get Triggers List)
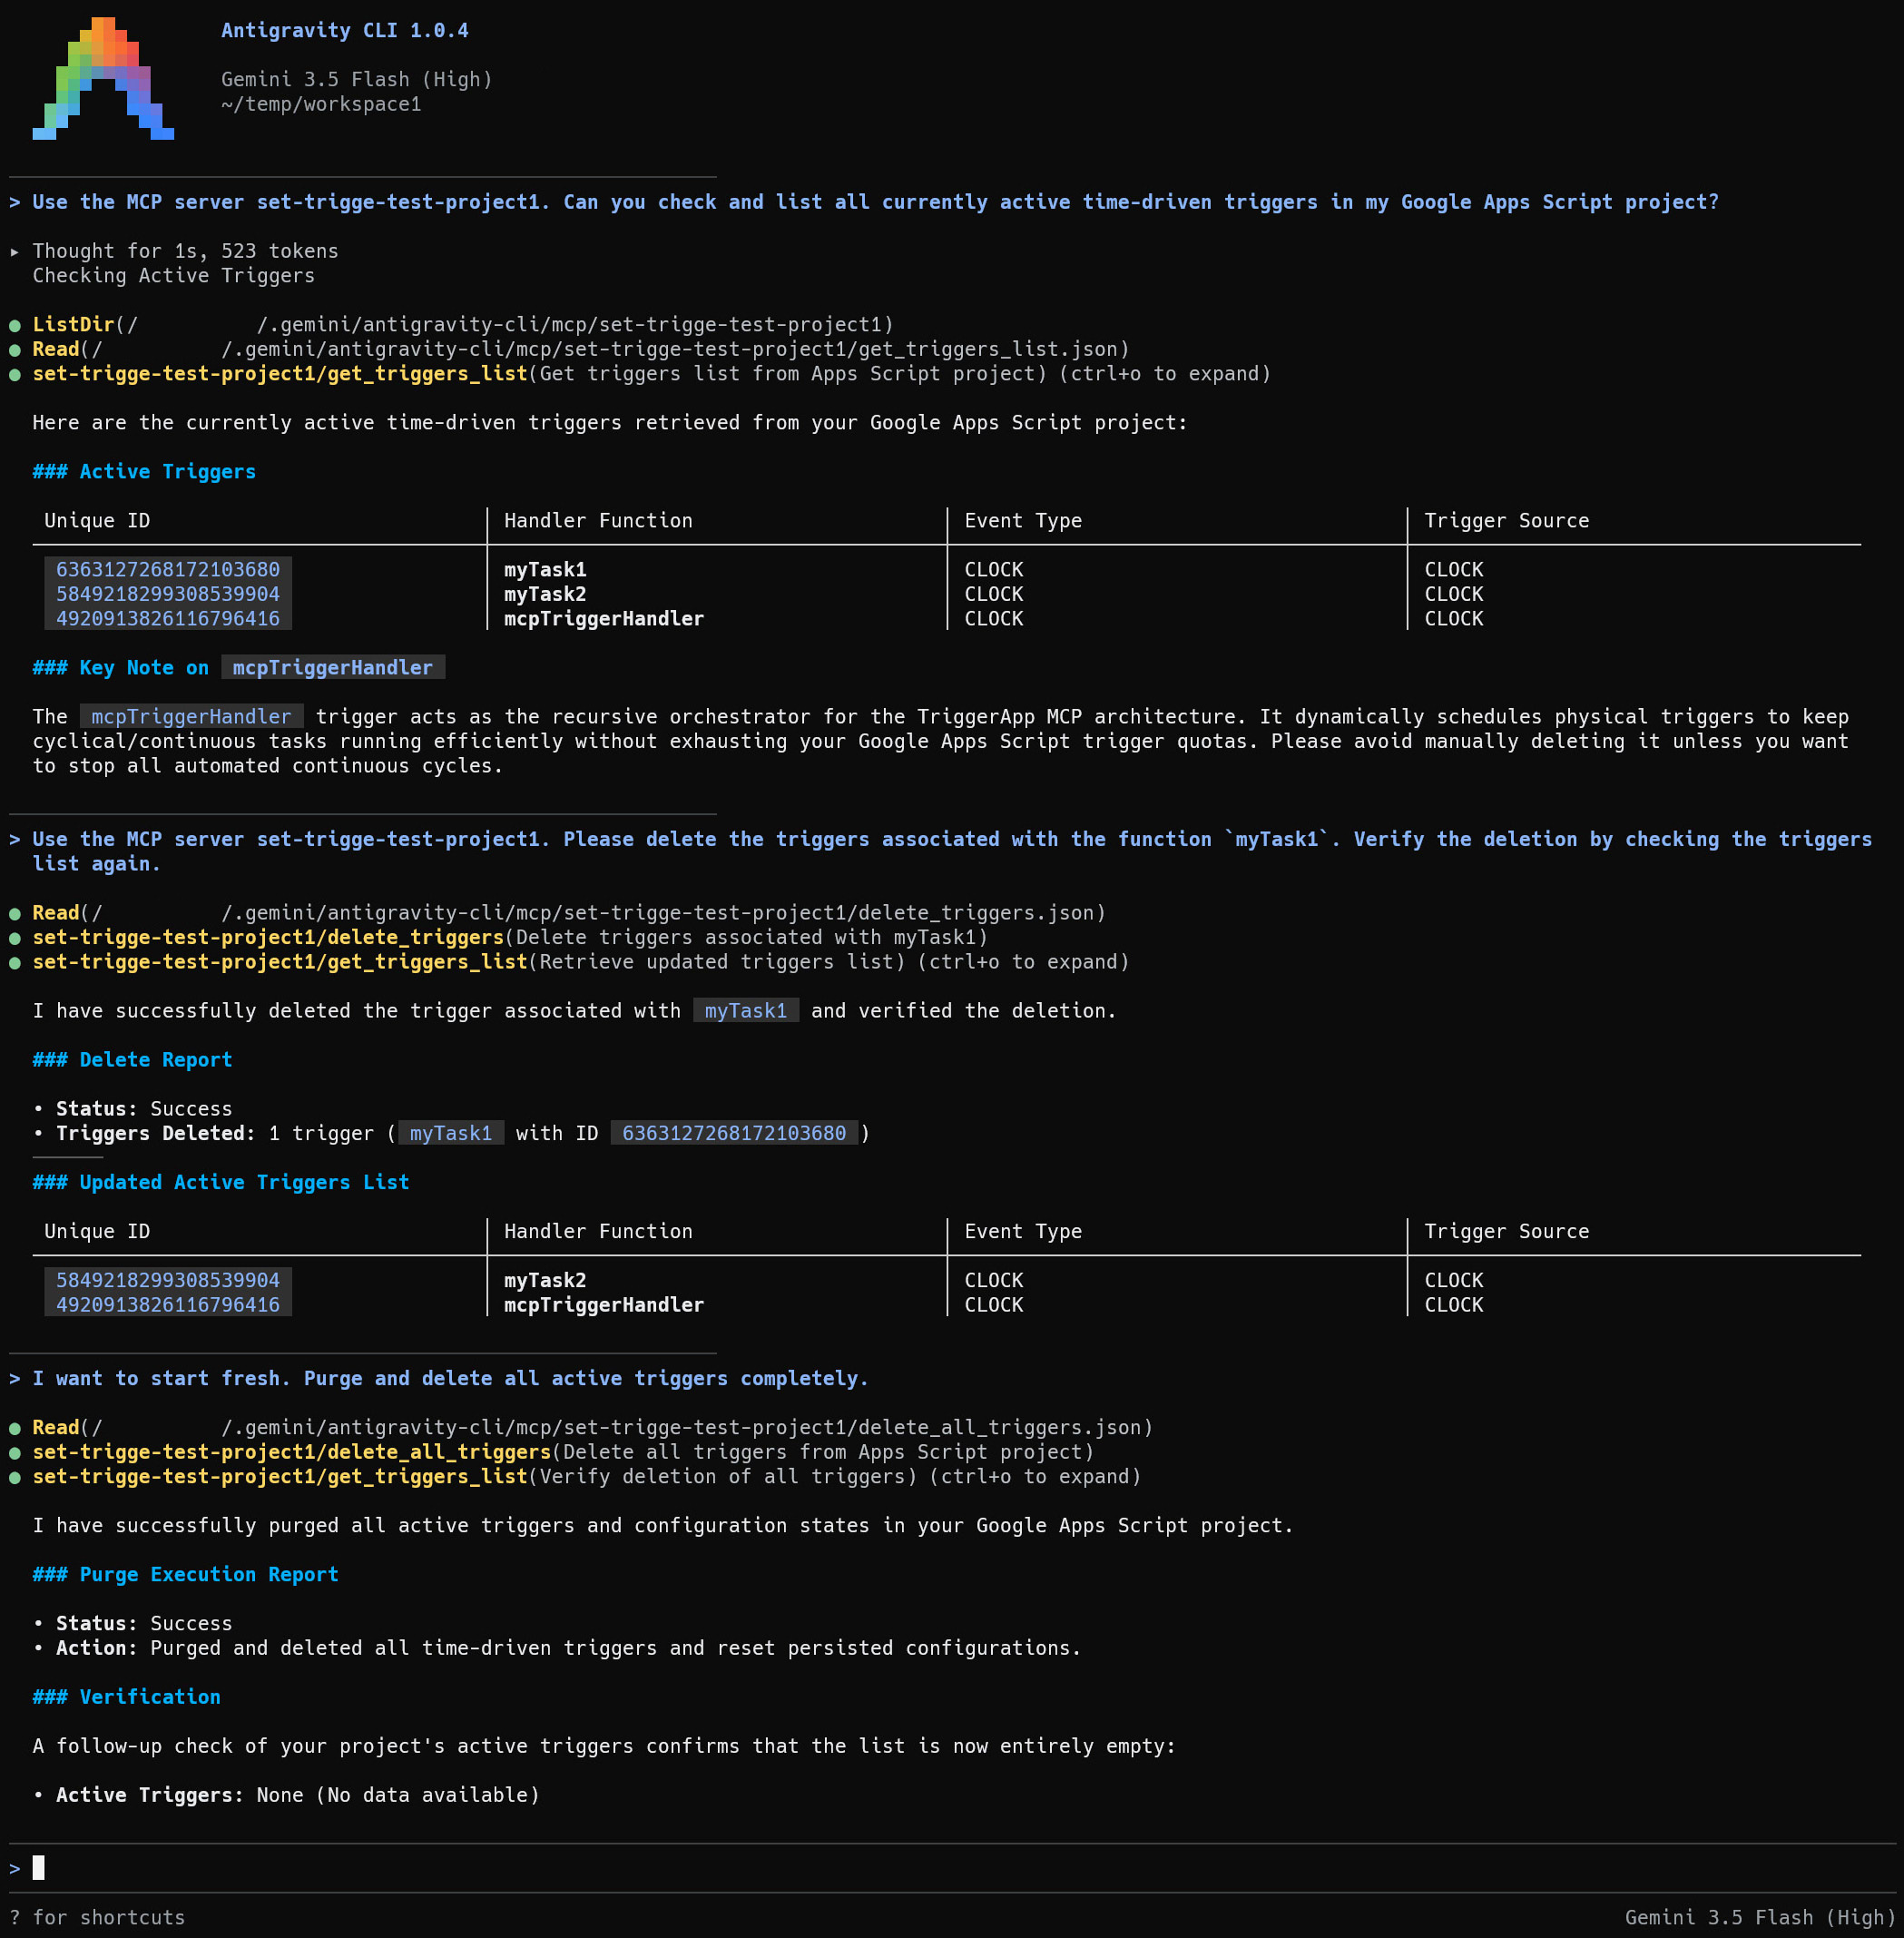
"Can you check and list all currently active time-driven triggers in my Google Apps Script project?"
2. Simulation & Installation (Simulate & Install Triggers)
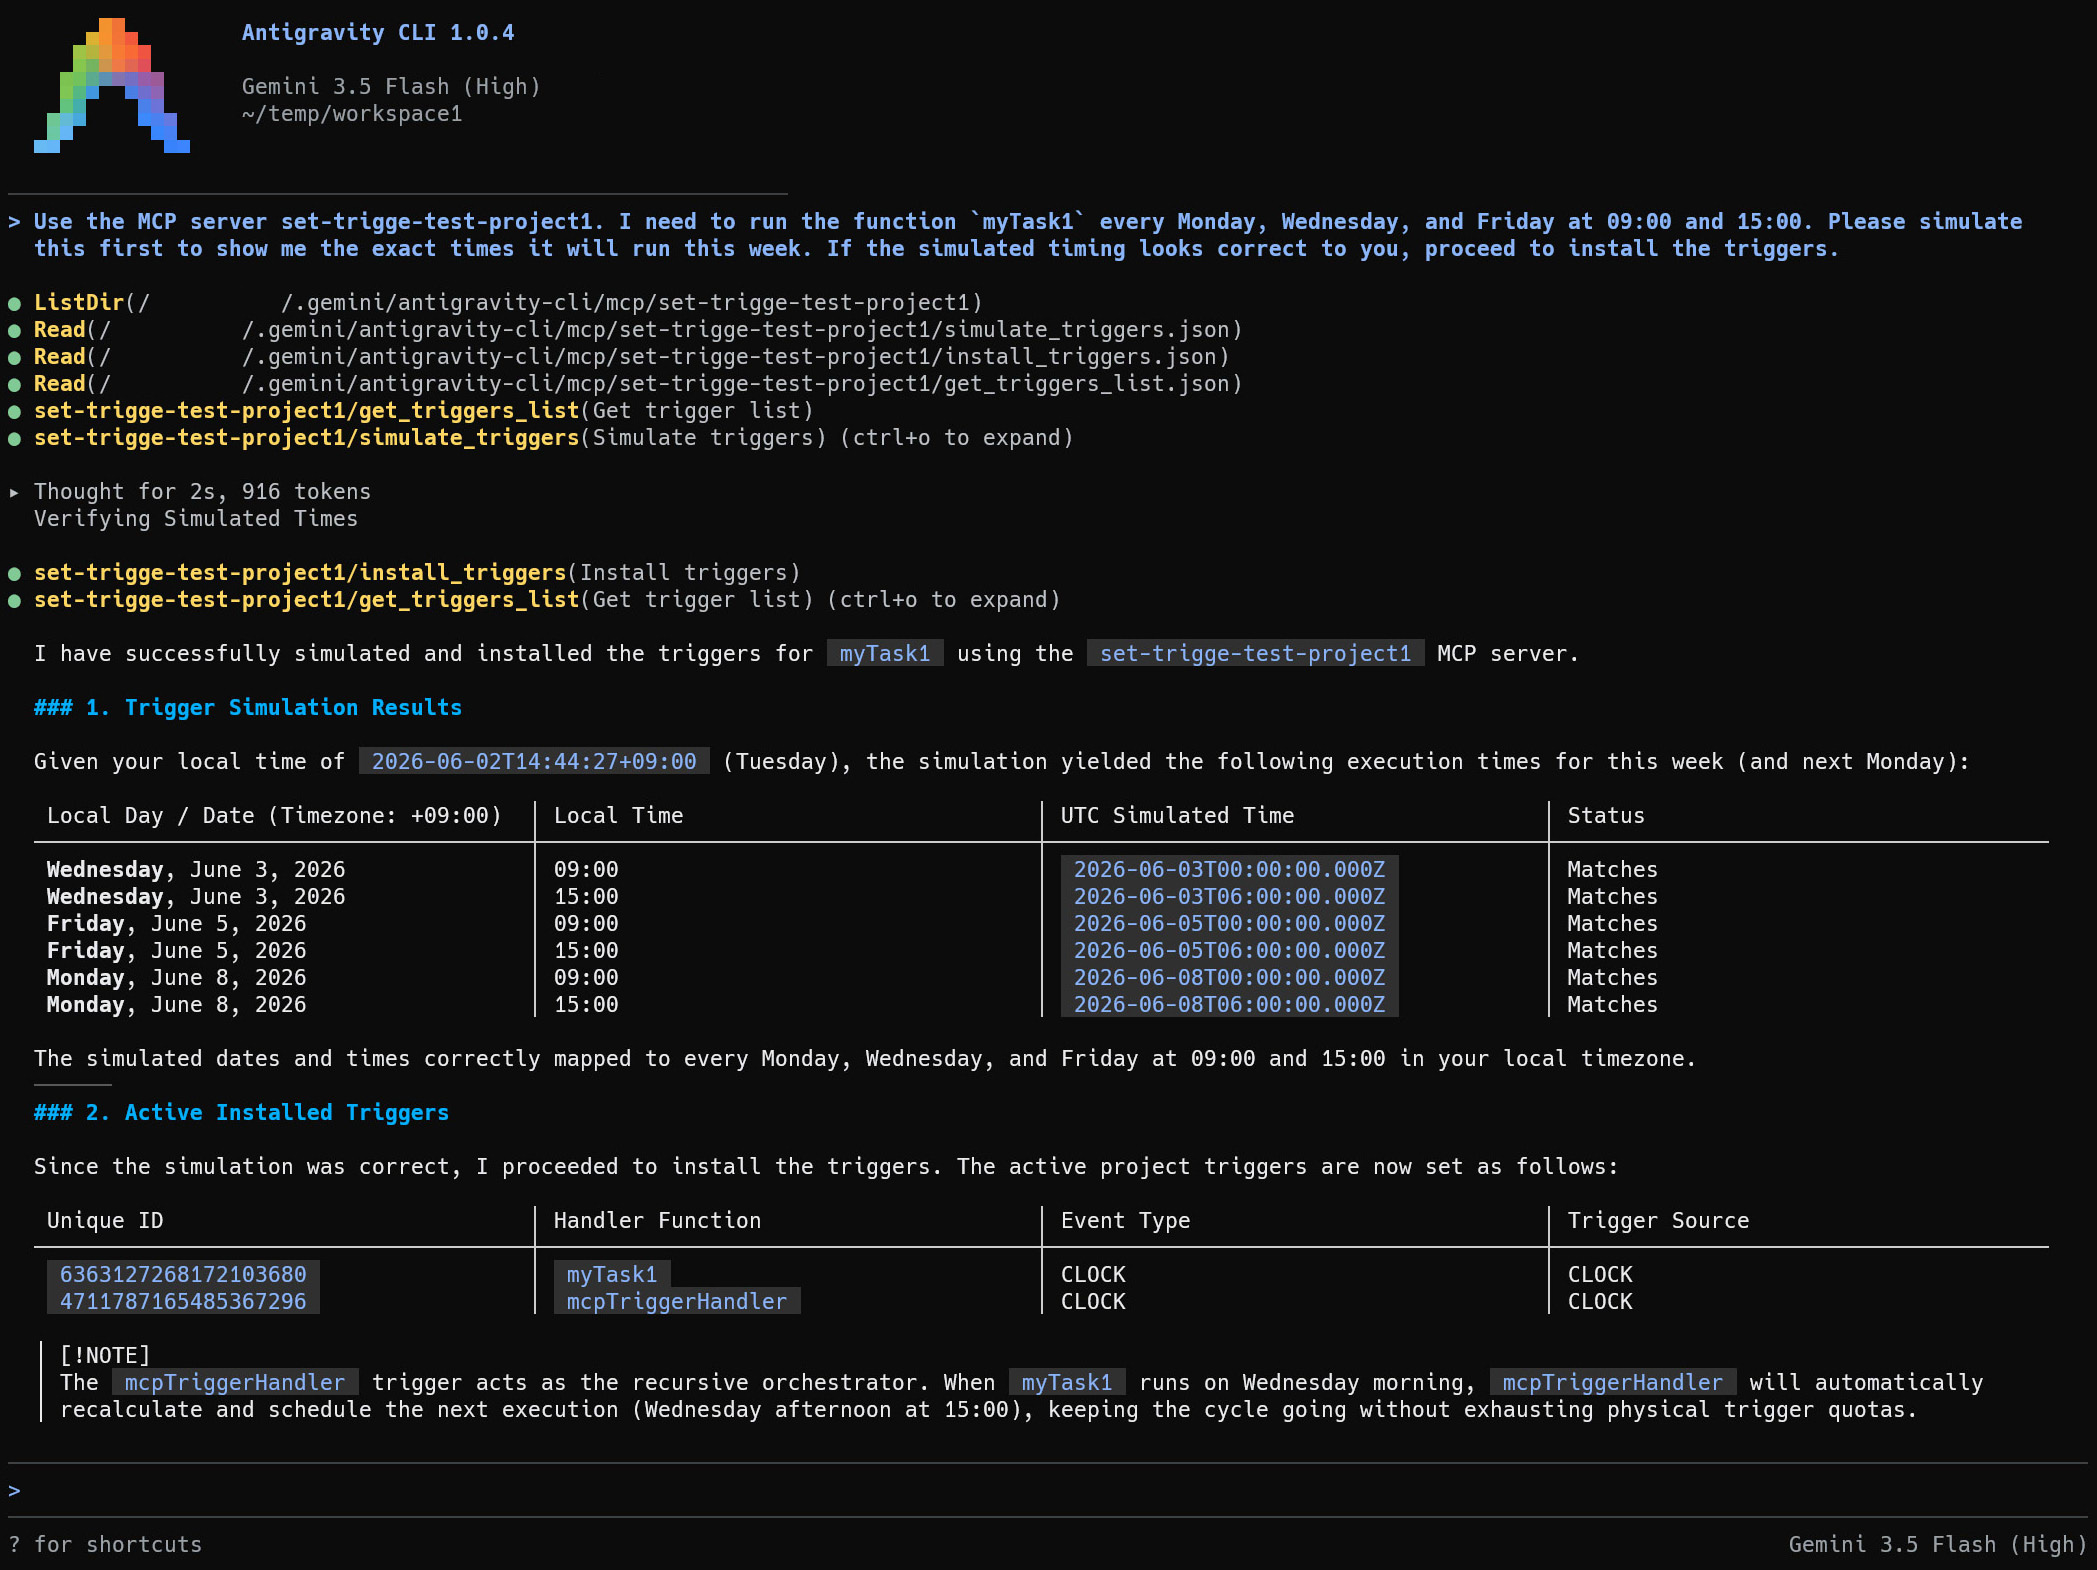
"Use the MCP server set-trigge-test-project1. I need to run the function
myTask1every Monday, Wednesday, and Friday at 09:00 and 15:00. Please simulate this first to show me the exact times it will run this week. If the simulated timing looks correct to you, proceed to install the triggers."
3. Complex Intervals
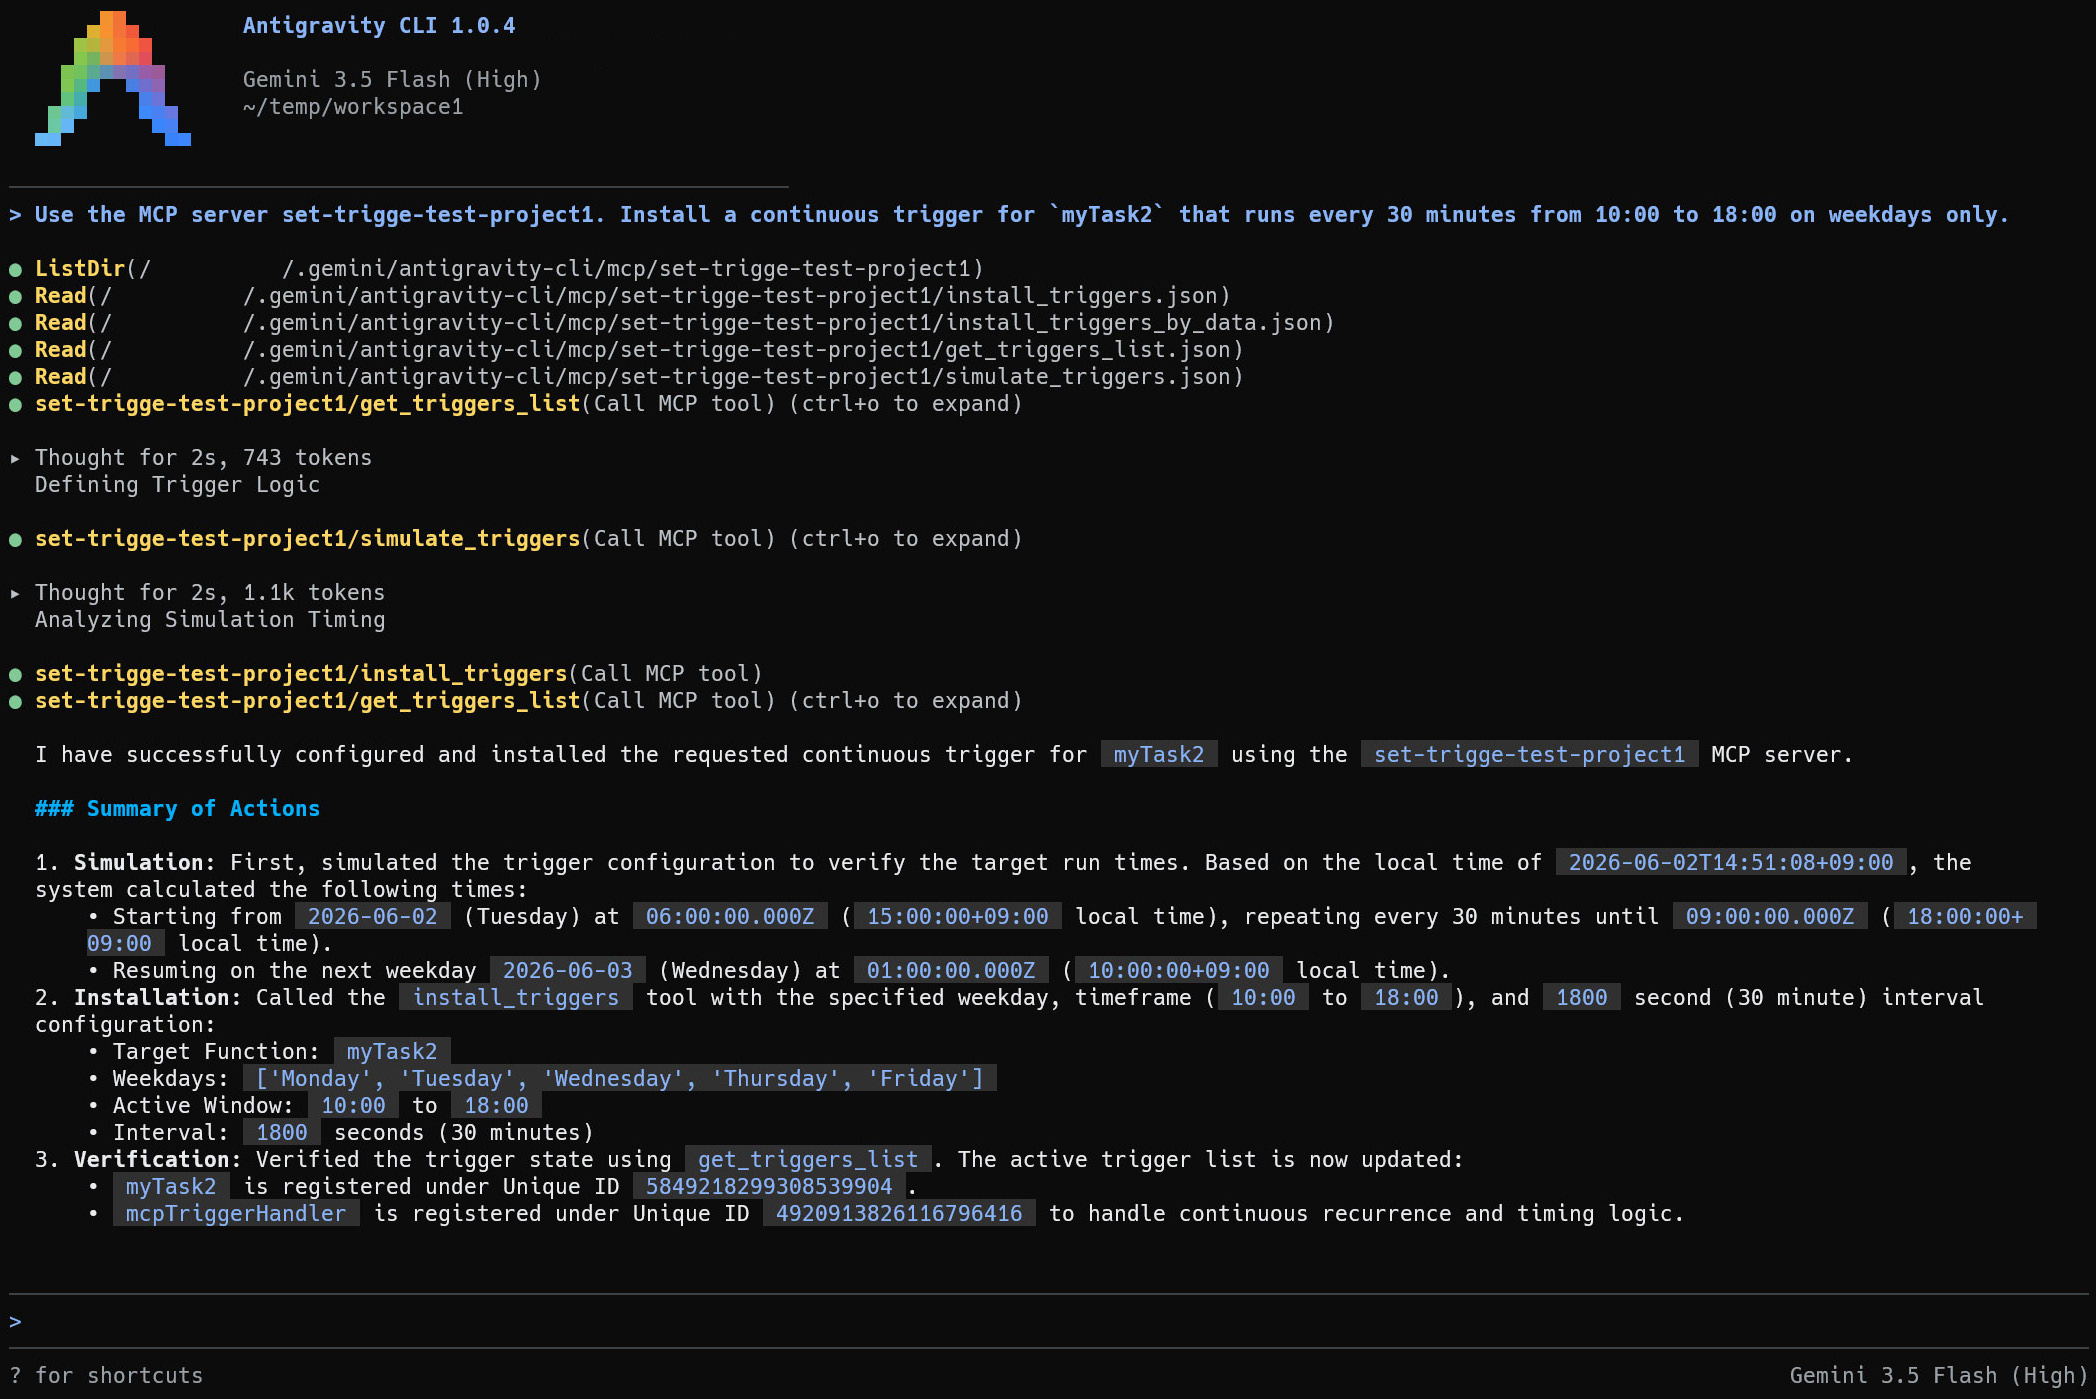
"Use the MCP server set-trigge-test-project1. Install a continuous trigger for
myTask2that runs every 30 minutes from 10:00 to 18:00 on weekdays only."
4. Deleting Specific Triggers
"Please delete the triggers associated with the function
myTask1. Verify the deletion by checking the triggers list again."
5. Complete Purge (Delete All Triggers)
"I want to start fresh. Purge and delete all active triggers completely."
Scopes
This library uses the following 1 scope. This scope is used for installing the time-driven triggers.
https://www.googleapis.com/auth/script.scriptapp
Methods
| Methods | Description |
|---|---|
| setEventObject | (Require) Give the event object from the time-driven trigger. |
| setCustomNow | When this method is used, the custom current date time can be used. If this is not used, the current date time is used. This will be used for simulating the triggers. |
| setDiffTriggerTime | Unit is second. The default value is 60 seconds. Difference of trigger time between "ownFunctionName" and "functionName". When this value is small, the trigger is reset by "ownFunctionName". By this, "functionName" is not run. Please adjust this value from your script of "functionName" of your work function. |
| setEase | Unit is second. The default value is 0 s. When the date time of a new trigger is calculated, if you want to give a wait time, you can set it using this method. |
| setScriptWaitTime | Unit is second. The default value is 0 s. When the script is run, when the date time for the next trigger time is very small, you can avoid this by this method. |
| setTriggerOffsetTime | Unit is second. The default value is 0. When the trigger time is just time and an error occurs, increase this value. But, most cases will be worked with 0. |
| setMaxOutputForSimulation | Default value is 20. When the simulation of triggers is run, set the maximum number of results. When "toDay" is not set in the inputted object, the infinite results are returned. This is used for fixing the number of results. When "toDay" is set in the inputted object, all results are returned. |
| installTriggers | This is the main method of this library. By giving the parameters, the specific functions are executed by the time-driven triggers. |
| installTriggersByData | This method installs the tasks given by data output from "simulateTriggers" method as the time-driven trigger. |
| simulateTriggers | This method can simulate the time-driven triggers by inputting the actual object for the setTriggers method. |
| getTriggers | Retrieves the list of all currently active time-driven triggers in the project. Output can be raw JSON or an LLM-optimized Markdown table. |
| deleteTriggers | Delete specific triggers targeted by their handler function names or their unique IDs. Syncs heavily with MCP configurations. |
| deleteAllTriggers | Delete all project triggers and completely wipe the state configurations. |
| mcp | Deploys the built-in MCP Server mapping TriggerApp's tools to HTTP endpoints. |
| executeMcpTriggers | Retrieves persisted state rules mapped via the MCP Server and executes them securely inside the global generic handler. |
| showLogs | Inject a custom callback to pipe execution logs out to a real-time monitor or array. |
| getLogs | Retrieves the complete history of execution logs for the current session. |
| addCustomLog | Inject your own strings and objects into the TriggerApp log stream. |
setEventObject
(Require) This method gives the event object from the time-driven trigger.
The sample script is as follows.
function sample(e) {
  const obj = [
    {
      ownFunctionName: "sample",
      functionName: "sampleFunction",
      everyDay: true,
      interval: 600,
      fromTime: "09:00",
      toTime: "17:00",
    },
  ];
  const res = TriggerApp.setEventObject(e).simulateTriggers(obj, console.log);
  console.log(res);
}
- In this case, the event object
eofsample(e)is used aseofsetEventObject(e).
setCustomNow
When this method is used, the custom current date time can be used. If this is not used, the current date time is used. This will be used for simulating the triggers.
The sample script is as follows.
function sample(e) {
  const obj = [
    {
      ownFunctionName: "sample",
      functionName: "sampleFunction",
      everyDay: true,
      interval: 600,
      fromTime: "09:00",
      toTime: "17:00",
    },
  ];
  const now = new Date("2023-01-01T00:00:00.000");
  const res = TriggerApp.setEventObject(e)
    .setCustomNow(now)
    .simulateTriggers(obj, console.log);
  console.log(res);
}
- In this case, the trigger tasks can be simulated by the custom current time like
new Date("2023-01-01T00:00:00.000").
setDiffTriggerTime
Unit is second. The default value is 60 seconds. Difference of trigger time between "ownFunctionName" and "functionName". When this value is small, the trigger is reset by "ownFunctionName". By this, "functionName" is not run. Please adjust this value from your script of "functionName" of your work function.
The sample script is as follows.
function sample(e) {
  const obj = [
    {
      ownFunctionName: "sample",
      functionName: "sampleFunction",
      everyDay: true,
      interval: 600,
      fromTime: "09:00",
      toTime: "17:00",
    },
  ];
  const res = TriggerApp.setEventObject(e)
    .setDiffTriggerTime(120)
    .installTriggers(obj, console.log);
  console.log(res);
}
- In this script, the function
samplefor calculating the next trigger time is run 2 minutes after the work functionsampleFunctionwas run.
IMPORTANT
As an important point, when you want to run the script every 1 minute, please set this value to less than 60 seconds. Because, in the case of the default value of 60 seconds, "ownFunctionName" and the next run of "functionName" is run simultaneously. But, when I tested a lot of times about the time-driven trigger, the script cannot be run at just time because of Google side. So, please be careful when you run the script every 1 minute.
setEase
Unit is second. The default value is 0 s. When the date time of a new trigger is calculated, if you want to give a wait time, you can set it using this method.
The sample script is as follows.
function sample(e) {
  const obj = [
    {
      ownFunctionName: "sample",
      functionName: "sampleFunction",
      everyDay: true,
      interval: 600,
      fromTime: "09:00",
      toTime: "17:00",
    },
  ];
  const res = TriggerApp.setEventObject(e)
    .setEase(10)
    .simulateTriggers(obj, console.log);
  console.log(res);
}
- In this script, the trigger times are calculated by
now + ease. In this case, when you see the actual script in this repository, it might be useful for understanding this.
setScriptWaitTime
Unit is second. The default value is 0 s. When the script is run, when the date time for the next trigger time is very small, you can avoid this by this method.
The sample script is as follows.
function sample(e) {
  const obj = [
    {
      ownFunctionName: "sample",
      functionName: "sampleFunction",
      everyDay: true,
      interval: 600,
      fromTime: "09:00",
      toTime: "17:00",
    },
  ];
  const res = TriggerApp.setEventObject(e)
    .setScriptWaitTime(10)
    .simulateTriggers(obj, console.log);
  console.log(res);
}
- In this script, when
sampleis run, the script is run after 10 seconds. In this case, when you see the actual script in this repository, it might be useful for understanding this.
setTriggerOffsetTime
Unit is second. The default value is 0. When the trigger time is just time and an error occurs, increase this value. But, most cases will be worked with 0.
The sample script is as follows.
function sample(e) {
  const obj = [
    {
      ownFunctionName: "sample",
      functionName: "sampleFunction",
      everyDay: true,
      interval: 600,
      fromTime: "09:00",
      toTime: "17:00",
    },
  ];
  const res = TriggerApp.setEventObject(e)
    .setTriggerOffsetTime(10)
    .simulateTriggers(obj, console.log);
  console.log(res);
}
- In this script, when the next trigger is calculated, 10 seconds are increased to it. In this case, when you see the actual script in this repository, it might be useful for understanding this.
setMaxOutputForSimulation
The default value is 20. When the simulation of triggers is run, set the maximum number of results. When "toDay" is not set in the inputted object, the infinite results are returned. This is used for fixing the number of results. When "toDay" is set in the inputted object, all results are returned.
The sample script is as follows.
function sample(e) {
  const obj = [
    {
      ownFunctionName: "sample",
      functionName: "sampleFunction",
      everyDay: true,
      interval: 600,
      fromTime: "09:00",
      toTime: "17:00",
    },
  ];
  const res = TriggerApp.setEventObject(e)
    .setMaxOutputForSimulation(5)
    .simulateTriggers(obj, console.log);
  console.log(res);
}
- In this sample, the trigger times can be simulated. The trigger times using this
objare returned. This can be used for checking whetherobjis correctly run with your expected trigger times without directly testing the triggers. In this case, only 5 data is returned bysetMaxOutputForSimulation(5).
installTriggers
This is the main method of this library. By giving the parameters, the specific functions are executed by the time-driven triggers.
The sample script is as follows.
function sample(e) {
  const obj = [
    {
      ownFunctionName: "sample",
      functionName: "sampleFunction",
      everyDay: true,
      interval: 600,
      fromTime: "09:00",
      toTime: "17:00",
    },
  ];
  const res = TriggerApp.setEventObject(e).installTriggers(obj, console.log);
  console.log(res);
}
-
In this sample, for example, when the now time is "2023-01-01 00:00:00" in your timezone, the function of "sampleFunction" is run at the trigger times of "2023-01-01 09:00:00", "2023-01-01 09:10:00",,,"2023-01-01 17:00:00", "2023-01-02 09:00:00", "2023-01-02 09:10:00",,,"2023-01-02 17:00:00",,,.
-
About the value of "obj", the various patterns can be used. I would like to introduce the sample patterns for understanding this in the below "Sample scenarios" section.
installTriggersByData
This method installs the trigger tasks given by data obtained by "simulateTriggers" method as the time-driven trigger.
The sample script is as follows.
function sample(e) {
  const obj = {
    ownFunctionName: "sample",
    data: [
      {
        triggerTime: new Date("2024-01-01T01:00:00"),
        executeFunction: "sampleFunction",
      },
      {
        triggerTime: new Date("2024-01-01T10:00:00"),
        executeFunction: "sampleFunction",
      },
    ],
  };
  const res = TriggerApp.setEventObject(e).installTriggersByData(obj);
  console.log(res);
}
-
In this case,
obj.datais the trigger task obtained by "simulateTriggers" method. Please be careful about this. -
In this sample, for example, when the current date is
2024-01-01T02:00:00, "sampleFunction" is run at "2024-01-01T01:00:00" and "2024-01-01T10:00:00". -
The values of
obj.datacan be retrieved by the followingsimulateTriggers. Ref
simulateTriggers
This method can simulate the time-driven triggers by inputting the actual object for the setTriggers method. For example, before you run installTriggers, you can confirm whether your object obj is a valid value for achieving your expected result.
The sample script is as follows.
function sample(e) {
  const obj = [
    {
      ownFunctionName: "sample",
      functionName: "sampleFunction",
      everyDay: true,
      interval: 600,
      fromTime: "09:00",
      toTime: "17:00",
    },
  ];
  const res = TriggerApp.setEventObject(e).simulateTriggers(obj, console.log);
  console.log(res);
}
In this sample, the trigger times can be simulated. The trigger times using this obj are returned. This can be used for checking whether obj is correctly running with your expected trigger times without directly testing the triggers.
For example, when "setCustomNow" method is used, you can simulate the trigger tasks with the custom date time as follows.
function sample(e) {
  const obj = [
    {
      ownFunctionName: "sample",
      functionName: "sampleFunction",
      everyDay: true,
      interval: 600,
      fromTime: "09:00",
      toTime: "17:00",
    },
  ];
  const now = new Date("2024-01-01T00:00:00.000");
  const res = TriggerApp.setEventObject(e)
    .setCustomNow(now)
    .simulateTriggers(obj, console.log);
  console.log(res);
}
getTriggers
Retrieves the list of all active triggers in the project. Output can be raw JSON or formatted as an LLM-friendly Markdown table.
// Retrieve as an Array
const rawList = TriggerApp.getTriggers();

// Retrieve as a Markdown table
const mdList = TriggerApp.getTriggers({ markdown: true });
console.log(mdList);
deleteTriggers
Destroys specific triggers using their linked handler function name or their exact unique IDs. When used via MCP or injected appropriately, configuration states are automatically cleared to prevent the triggers from resurrecting themselves.
TriggerApp.deleteTriggers({
  functionNames: ["sampleFunction", "oldTask"],
  uniqueIds: ["12345678", "87654321"],
});
deleteAllTriggers
Delete all project triggers of the current Google Apps Script project. This method can be used independently from other methods and natively purges all MCP states if PropertiesService is injected.
The sample script is as follows.
function deleteAllTriggers() {
  TriggerApp.deleteAllTriggers(PropertiesService.getScriptProperties());
}
- This script deletes all triggers of this Google Apps Script project.
Object for installTriggers and simulateTriggers
In this library, an object is used for executing the time-driven trigger. It's obj of installTriggers(obj, console.log) and simulateTriggers(obj, console.log). There are several important rules for this object.
objis required to be an array including JSON object.- The JSON object has the following 12 properties. In this library, the time-driven triggers for various situations can be achieved by combining these properties.
- ownFunctionName: string: Function name of the function for running
installTriggersandsimulateTriggers. (Note: For MCP architecture, this is safely injected and obfuscated internally.) - functionName: string: Function name of the function you want to run with the time-driven trigger.
- everyDay: boolean: When this is true, the trigger is run every day.
- everyWeek: string[]: When
["Monday", "Friday"]is set, the trigger is run at "Monday" and "Friday" in every week. - everyMonth: number[]: When
[1, 5]is set, the trigger is run at 1st day and 5th day in every month. - everyYear: string[]: When
["2023-07-15", "2023-09-15"]is set, the trigger is run at July, 15, and September 15 in every year. - interval: number: Unit is seconds. When
600is set, the trigger is run every 600 seconds. This is used together witheveryDay,everyWeek,everyMonth, andeveryYear. - atTimes: string[]: When
["09:00","15:00"]is set, the trigger is run at "09:00" and "15:00". This is used together witheveryDay,everyWeek,everyMonth, andeveryYear. - fromDay: string: RFC 3339. When
2023-10-01T00:00:00.000Zis set, the trigger is run from it. If this is not used, the current time is used asfromDay. - toDay: string: RFC 3339. When
2023-10-01T00:00:00.000Zis set, the trigger is run to it. If this is not used, the trigger is repeated infinity. - fromTime: string: When
"09:00"is used, the triggers ofintervalis run from it. - toTime: string: When
"17:00"is used, the triggers ofintervalis run to it.
- ownFunctionName: string: Function name of the function for running
I'm worried that it might be difficult to completely understand the method for using this library by only the above explanation. So, I would like to introduce my actual object for using this library in the next section. I believe that knowing the situation I am using might lead to understanding this library.
Sample scenarios
Here, I would like to introduce several scenarios for managing the time-driven triggers using this library. I am actually using these all scenarios in my work. I believe that you can use this library by referring to these scenarios.
Here, as a sample current time in order to explain these scenarios, new Date("2024-01-01T00:00:00.000") is used.
Scenario 1
Run "sampleFunction1" and "sampleFunction2" at "2024-01-15T09:00:00" and "2024-02-25T10:00:00" only one time, respectively.
function sample(e) {
  const obj = [
    {
      ownFunctionName: "sample",
      functionName: "sampleFunction1",
      everyMonth: [15],
      atTimes: ["09:00:00"],
      fromDay: "2024-01-15T00:00:00.000",
      toDay: "2024-01-16T00:00:00.000",
    },
    {
      ownFunctionName: "sample",
      functionName: "sampleFunction2",
      everyMonth: [25],
      atTimes: ["10:00:00"],
      fromDay: "2024-02-25T00:00:00.000",
      toDay: "2024-02-26T00:00:00.000",
    },
  ];
  const res = TriggerApp.setEventObject(e).installTriggers(obj, console.log);
  console.log(res);
}
For example, when const res = TriggerApp.setEventObject(e).installTriggers(obj, console.log) is replaced with const res = TriggerApp.setEventObject(e).simulateTriggers(obj), this process can be simulated. When the above obj is used, the following result is returned.
[
  {
    "triggerTime": "2024-01-15T09:00:00",
    "executeFunction": "sampleFunction1"
  },
  { "triggerTime": "2024-02-25T10:00:00", "executeFunction": "sampleFunction2" }
]
From this result, it is found that the value of obj is a valid value for using installTriggers and the expected process can be achieved. After you confirmed the process of triggers by this simulation, you can actually run obj with installTriggers.
For example, the following object obtains the same result as the above one. There are several patterns for achieving the same process by combining the properties of obj.
function sample(e) {
  const obj = [
    {
      ownFunctionName: "sample",
      functionName: "sampleFunction1",
      everyYear: ["2024-01-15"],
      atTimes: ["09:00:00"],
      fromDay: "2024-01-01T00:00:00.000",
      toDay: "2024-02-01T00:00:00.000",
    },
    {
      ownFunctionName: "sample",
      functionName: "sampleFunction2",
No comments yet
Be the first to share your take.