
Disclaimer
This project is provided as-is and serves as an example implementation of the MCP Proxy using various strategies. While we strive to address security-related issues, adopters are responsible for maintaining their own security checks, reviews, and ongoing maintenance. Use this project as a reference and adapt it to your own requirements and security standards.
MCP Proxy with OAuth 2.1 Sidecar
A production-ready MCP (Model Context Protocol) proxy system with enterprise-grade OAuth 2.1 authentication, deployable on AWS using CDK (TypeScript) infrastructure.
What is this solution? The MCP Proxy bridges the gap between enterprise security requirements and the diverse landscape of MCP clients. It provides a unified, secure gateway that enables any MCP client to authenticate against Google Workspace and access multiple backend services through a single endpoint, regardless of the client's OAuth capabilities or limitations.
Key Enterprise Benefits:
- Unified Adoption Experience: Single endpoint configuration eliminates the need for complex, per-service MCP client setups
- Simplified MDM Deployment: Enterprise IT can deploy standardized MCP configurations across the organization using Mobile Device Management (MDM) systems with just one proxy endpoint instead of managing multiple service configurations
- Reduced Configuration Complexity: Clients only need to know one URL (
https://your-mcp-proxy-url/mcp) instead of managing dozens of individual MCP server endpoints and their respective authentication mechanisms
Architecture Overview
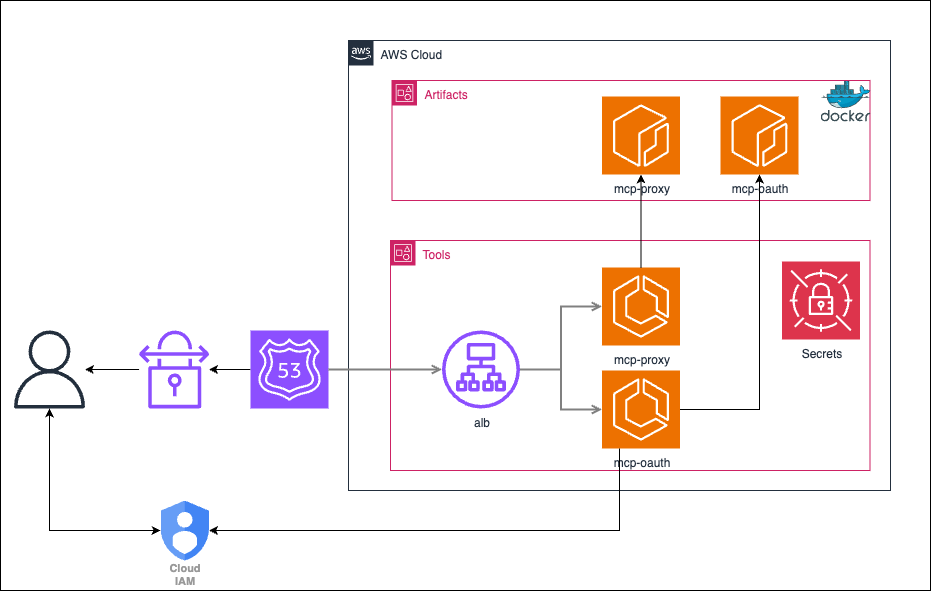
The system consists of three main components that work together to provide a secure, scalable MCP proxy solution:
1. MCP Proxy Service (docker/mcp_proxy/)
- Aggregated MCP proxy server with Google Workspace authentication
- Multi-Transport Support: Native HTTP and STDIO transport protocols for optimal performance
- Comprehensive activity logging and secure access control
- Documentation: docker/mcp_proxy/mcp_proxy.md
2. OAuth 2.1 Sidecar Service (docker/mcp_oauth/)
- Dynamic Client Registration (DCR): RFC 7591 compliant automatic client credential provisioning
- OAuth Discovery: RFC 8414 compliant authorization server metadata discovery
- Unified Authentication Flow: All MCP clients follow the same OAuth flow with automatic DCR
- Callback Forwarding: Handles localhost callbacks for desktop and CLI clients
- Documentation: docker/mcp_oauth/mcp_oauth.md
3. AWS Infrastructure (cdk/mcp-proxy/)
- CDK stack definitions for AWS deployment with environment-specific configuration
- Documentation: cdk/mcp-proxy/README.md
- Configuration Guide: cdk/mcp-proxy/CONFIGURATION.md
OAuth 2.1 Authentication with Dynamic Client Registration
The MCP proxy uses a sophisticated OAuth 2.1 sidecar service that provides enterprise-grade authentication with automatic Dynamic Client Registration for all MCP clients.
Purpose and Design Philosophy
The MCP Proxy system is designed to solve a fundamental challenge: enabling secure, enterprise-grade authentication for MCP (Model Context Protocol) connections while maintaining compatibility across diverse client implementations.
Core Problems Addressed:
- Enterprise Authentication Gap: Many MCP implementations lack robust authentication mechanisms suitable for enterprise environments
- Client Heterogeneity: Different MCP clients (Claude Code, VS Code extensions, desktop applications) have varying OAuth capabilities and limitations
- Security at Scale: Need for centralized authentication, logging, and access control across multiple backend services
- Developer Experience: Simplifying the complexity of OAuth flows while maintaining security standards
Solution Architecture: The OAuth sidecar acts as an intelligent authentication proxy that provides a unified, secure gateway to MCP services through Dynamic Client Registration.
Why do we need an OAuth sidecar
The OAuth sidecar serves as a compatibility and security bridge between diverse MCP clients and enterprise authentication requirements.
1. Client Limitations & Compatibility
Many MCP clients have fundamental limitations when working with standard OAuth flows:
- Missing scope headers: Some clients don't properly send OAuth scope parameters, causing identity provider authentication to fail
- Dynamic port mappings for callbacks: Clients use randomized port mappings for localhost callbacks, requiring all possible localhost ports to be pre-registered in the oauth provider (security risk)
- Inconsistent OAuth support: Some clients require Dynamic Client Registration (DCR), but many OAuth providers (like Google) don't support this out of the box for security reasons
- Transport protocol variations: Different clients prefer different transport mechanisms (HTTP vs STDIO)
2. Enterprise Security Requirements
- Centralized authentication: Single point of control for user authentication and authorization
- Comprehensive logging: Tracking of all user actions and authentication events
- Domain restrictions: Ensuring only authorized Google Workspace users can access services
- Token management: Secure handling of refresh tokens and session management
3. Operational Simplification
- Client-agnostic deployment: Backend services don't need to handle OAuth complexity
- Consistent user experience: Users get the same authentication flow regardless of their client choice
- Reduced configuration burden: Clients only need to know the proxy endpoint, not individual service OAuth details
How Authentication Works
1. Dynamic Client Registration (DCR)
- RFC 7591 compliant automatic client credential provisioning
- All MCP clients follow the same unified OAuth flow
- No manual Google Cloud Console configuration required
- Restricted callback URIs for approved MCP clients only
2. OAuth 2.1 Discovery
- Clients auto-discover endpoints from
/.well-known/oauth-protected-resourceand/.well-known/oauth-authorization-server - Unified endpoint metadata for all client types
3. Authentication Flow
- User is redirected to Google's authentication page for login
- Standard OAuth 2.0/OpenID Connect flow with Google Workspace validation
- Only users in the configured Google Workspace domain are authorized
4. Session Management
- Bearer tokens validated and cached by the proxy for 5 minutes
- All user actions logged for audit and troubleshooting
Prerequisites
Before deploying the MCP Proxy system, you need to set up several components in both Google Cloud Platform and AWS.
1. Google Cloud Platform Setup
Google OAuth Application
Create a Google OAuth application for authentication:
-
Create or select a GCP project:
- Go to Google Cloud Console
- Create a new project or select an existing one
- Note the project ID for later use
-
Enable required APIs:
gcloud services enable iam.googleapis.com gcloud services enable iamcredentials.googleapis.com gcloud services enable cloudresourcemanager.googleapis.com -
Configure OAuth consent screen:
- Go to APIs & Services > OAuth consent screen
- Choose "Internal" for Google Workspace domains
- Fill in application name, user support email, and developer contact
- Add authorized domains if needed
-
Create OAuth 2.0 credentials:
- Go to APIs & Services > Credentials
- Click "Create Credentials" > "OAuth 2.0 Client IDs"
- Application type: "Web application"
- Add authorized redirect URIs:
https://your-mcp-proxy-domain/auth/callback
- Save the Client ID and Client Secret for AWS Secrets Manager
Google Workload Identity Federation
Set up Workload Identity Federation for secure authentication from AWS:
-
Create a service account:
gcloud iam service-accounts create mcp-proxy-sa \ --description="Service account for MCP Proxy" \ --display-name="MCP Proxy Service Account" -
Grant required permissions:
# Allow the service account to impersonate itself gcloud projects add-iam-policy-binding YOUR_PROJECT_ID \ --member="serviceAccount:mcp-proxy-sa@YOUR_PROJECT_ID.iam.gserviceaccount.com" \ --role="roles/iam.serviceAccountTokenCreator" # Enable Admin SDK API for domain-wide delegation gcloud services enable admin.googleapis.com --project="YOUR_PROJECT_ID" -
Configure domain-wide delegation (Required for Google Workspace user authentication):
a. Get the service account's unique ID:
gcloud iam service-accounts describe mcp-proxy-sa@YOUR_PROJECT_ID.iam.gserviceaccount.com \
  --format="value(uniqueId)"
b. Set up domain-wide delegation in Google Workspace Admin Console:
- Go to Google Workspace Admin Console
- Navigate to Security > Access and data control > API controls
- Click "Manage Domain-wide Delegation"
- Click "Add new" and enter:
- Client ID: The unique ID from step 3a
- OAuth scopes:
https://www.googleapis.com/auth/admin.directory.user.readonly,https://www.googleapis.com/auth/admin.directory.group.member.readonly
- Click "Authorize"
-
Create Workload Identity Pool:
# TODO: Replace ${PROJECT_ID} with your GCP project ID gcloud iam workload-identity-pools create mcp-proxy-pool \ --project="${PROJECT_ID}" \ --location="global" \ --display-name="MCP Proxy AWS Pool" \ --description="Workload Identity Pool for MCP Proxy running on AWS ECS" -
Get the full Workload Identity Pool ID:
# TODO: Replace ${PROJECT_ID} with your GCP project ID
gcloud iam workload-identity-pools describe mcp-proxy-pool \
  --project="${PROJECT_ID}" \
  --location="global" \
  --format="value(name)"
This should return a value like:
projects/123456789/locations/global/workloadIdentityPools/mcp-proxy-pool -
Create Workload Identity Provider for AWS with security constraints:
🛑 SECURITY NOTE: Always add attribute conditions to restrict access to the Workload Identity Pool. The condition below restricts access to only your specific AWS account and ECS task role.
# TODO: Replace ${PROJECT_ID}, ${AWS_ACCOUNT_ID}, and ${ECS_TASK_ROLE_NAME} with your values
gcloud iam workload-identity-pools providers create-aws mcp-proxy-aws \
  --project="${PROJECT_ID}" \
  --workload-identity-pool="mcp-proxy-pool" \
  --location="global" \
  --display-name="MCP Proxy AWS Provider" \
  --account-id="${AWS_ACCOUNT_ID}" \
  --attribute-mapping="google.subject=assertion.arn,attribute.aws_role=assertion.arn" \
  --attribute-condition="attribute.aws_role.startsWith('arn:aws:sts::${AWS_ACCOUNT_ID}:assumed-role/${ECS_TASK_ROLE_NAME}/')"
Example with actual values:
# If your AWS account ID is 123456789012 and ECS task role is mcp-proxy-task-role gcloud iam workload-identity-pools providers create-aws mcp-proxy-aws \ --project="my-project-id" \ --workload-identity-pool="mcp-proxy-pool" \ --location="global" \ --display-name="MCP Proxy AWS Provider" \ --account-id="123456789012" \ --attribute-mapping="google.subject=assertion.arn,attribute.aws_role=assertion.arn" \ --attribute-condition="attribute.aws_role.startsWith('arn:aws:sts::123456789012:assumed-role/mcp-proxy-task-role/')" -
Bind service account to Workload Identity with specific role constraint:
# TODO: Replace ${PROJECT_ID}, ${WORKLOAD_IDENTITY_POOL_ID}, ${AWS_ACCOUNT_ID}, and ${ECS_TASK_ROLE_NAME} # ${WORKLOAD_IDENTITY_POOL_ID} is the full pool ID from step 5 gcloud iam service-accounts add-iam-policy-binding \ "mcp-proxy-sa@${PROJECT_ID}.iam.gserviceaccount.com" \ --project="${PROJECT_ID}" \ --role="roles/iam.workloadIdentityUser" \ --member="principalSet://iam.googleapis.com/${WORKLOAD_IDENTITY_POOL_ID}/attribute.aws_role/arn:aws:sts::${AWS_ACCOUNT_ID}:assumed-role/${ECS_TASK_ROLE_NAME}" -
Extract the Workload Identity Provider resource name:
# TODO: Replace ${PROJECT_ID} with your GCP project ID
gcloud iam workload-identity-pools providers describe mcp-proxy-aws \
  --project="${PROJECT_ID}" \
  --workload-identity-pool="mcp-proxy-pool" \
  --location="global" \
  --format="value(name)"
This will return the full provider name needed for the configuration file.
-
Generate the Workload Identity configuration:
# TODO: Replace ${PROJECT_ID} with your GCP project ID
gcloud iam workload-identity-pools providers describe mcp-proxy-aws \
  --project="${PROJECT_ID}" \
  --workload-identity-pool="mcp-proxy-pool" \
  --location="global" \
  --format="export" > workload-identity-configuration.json
Security Considerations for Workload Identity Federation
🛡️ Important Security Guidelines:
-
Always use attribute conditions: The attribute condition in step 5 ensures that only your specific AWS ECS task role can authenticate. Never create a provider without proper conditions.
-
Domain-wide delegation setup: The MCP Proxy requires domain-wide delegation to access Google Workspace APIs for user authentication and group membership validation.
-
Required Google Workspace API scopes: Configure the service account with these specific scopes:
https://www.googleapis.com/auth/admin.directory.user.readonly- Read user informationhttps://www.googleapis.com/auth/admin.directory.group.member.readonly- Read group memberships
Setting up domain-wide delegation:
# Enable the Admin SDK API
gcloud services enable admin.googleapis.com --project="${PROJECT_ID}"

# Note the service account's unique ID for Google Workspace Admin Console
gcloud iam service-accounts describe mcp-proxy-sa@${PROJECT_ID}.iam.gserviceaccount.com \
  --format="value(uniqueId)"
Then in Google Workspace Admin Console:
- Go to Security > Access and data control > API controls
- Click "Manage Domain-wide Delegation"
- Add the service account's unique ID with scopes:
https://www.googleapis.com/auth/admin.directory.user.readonly,https://www.googleapis.com/auth/admin.directory.group.member.readonly
-
Principle of least privilege: Grant only the minimum required permissions to the service account. Avoid broad administrative roles when domain-wide delegation is configured.
2. AWS Infrastructure Prerequisites
VPC Configuration
- Existing VPC with public (if using external loadbalancer) and private subnets
- Internet Gateway attached to public subnets
- NAT Gateway or NAT Instance for private subnet internet access
- Route tables properly configured for public/private routing
- Security groups allowing HTTPS traffic (port 443) and your custom ports
ECR Repositories
Create ECR repositories for the container images:
# Create repositories
aws ecr create-repository --repository-name mcp-proxy
aws ecr create-repository --repository-name mcp-oauth

# Note the repository URIs for configuration
aws ecr describe-repositories --repository-names mcp-proxy mcp-oauth
Route53 Hosted Zone
- Hosted Zone for your domain (e.g.,
example.com) - Domain ownership verified and DNS pointing to Route53
- Note the Hosted Zone ID for configuration
# List hosted zones
aws route53 list-hosted-zones

# Get hosted zone details
aws route53 get-hosted-zone --id /hostedzone/Z03108621XXXXXXXXXX
ACM Certificate
Request or import an SSL certificate for your domain:
# Request a certificate (DNS validation recommended)
aws acm request-certificate \
  --domain-name "*.example.com" \
  --domain-name "example.com" \
  --validation-method DNS \
  --region eu-west-1

# Note the certificate ARN for configuration
aws acm list-certificates --region eu-west-1
S3 Assets Bucket
Create an S3 bucket for CDK assets:
# Create bucket (name must be globally unique)
aws s3 mb s3://mcp-proxy-YOUR_ACCOUNT_ID-eu-west-1-assets

# Enable versioning (recommended)
aws s3api put-bucket-versioning \
  --bucket mcp-proxy-YOUR_ACCOUNT_ID-eu-west-1-assets \
  --versioning-configuration Status=Enabled
3. AWS Secrets Manager
Store sensitive configuration in AWS Secrets Manager:
Google OAuth Secret
aws secretsmanager create-secret \
  --name "mcp-proxy/googleOAuth" \
  --description "Google OAuth credentials for MCP Proxy" \
  --secret-string '{
    "client_id": "your-google-oauth-client-id.apps.googleusercontent.com",
    "client_secret": "your-google-oauth-client-secret"
  }'
Google Workload Identity Federation Secret
aws secretsmanager create-secret \
  --name "mcp-proxy/googleWIF" \
  --description "Google Workload Identity Federation configuration" \
  --secret-string file://workload-identity-configuration.json
Optional MCP Server Secrets
Create additional secrets for optional MCP servers:
# Grafana (optional)
aws secretsmanager create-secret \
  --name "mcp-proxy/grafana" \
  --secret-string '{"api_key": "your-grafana-api-key", "url": "https://your-grafana.url"}'

# PostHog (optional)
aws secretsmanager create-secret \
  --name "mcp-proxy/posthog" \
  --secret-string '{"api_key": "your-posthog-api-key", "host": "https://app.posthog.com"}'

# OpenMetadata (optional)
aws secretsmanager create-secret \
  --name "mcp-proxy/openmetadata" \
  --secret-string '{"api_key": "your-openmetadata-jwt", "host": "https://your-openmetadata.url"}'
4. AWS Permissions
Ensure your AWS credentials have permissions for:
- ECS: Full access for cluster and service management
- EC2: VPC, security groups, and load balancer management
- IAM: Role creation and policy management
- Route53: DNS record management
- Secrets Manager: Secret access and management
- ECR: Repository access for container images
- CloudWatch: Log group creation and management
- S3: Asset bucket access
5. Development Tools
- Node.js (v18 or later) and npm
- AWS CLI configured with appropriate credentials
- AWS CDK installed
- Docker (for local development and image building)
- Google Cloud SDK (for GCP setup, it can be configured in console)
Quick Start
Prerequisites
- AWS account with appropriate permissions
- Node.js and npm
- AWS CDK installed (eg installed globaly
npm install -g aws-cdk) - Docker (for local development)
1. Configure Infrastructure
The MCP Proxy uses AWS CDK (Cloud Development Kit) for infrastructure as code deployment. For detailed setup instructions, see:
- Quick Start: cdk/mcp-proxy/README.md
- Configuration Guide: cdk/mcp-proxy/CONFIGURATION.md
Basic deployment workflow:
- Navigate to
cdk/mcp-proxy/and install dependencies - Copy
cdk.example.jsonctocdk.jsonand configure your AWS settings - Bootstrap CDK in your target account/region
- Deploy infrastructure with
npm run cdk deploy
The CDK supports multiple environments (dev, staging, production) with environment-specific configuration.
Deployment Architecture
The CDK deploys several AWS resources:
- ECS Cluster: Container orchestration for MCP Proxy and OAuth services
- Application Load Balancer: HTTPS termination and traffic routing
- Secrets Manager: Secure storage for OAuth credentials and API keys
- CloudWatch: Logging and monitoring
- IAM Roles: Service permissions and Workload Identity Federation
- Route53: DNS configuration for your domain
2. Deploy Services
After infrastructure is deployed, the containerized services will be automatically deployed via ECS.
3. Configure Client
Once deployed, configure your MCP client to use http:
{
  "servers": {
    "mcp-proxy": {
      "url": "https://your-mcp-proxy-url/mcp",
      "type": "http"
    }
  }
}
Client Integration Examples
VS Code MCP Extension
Supports OAuth 2.1 Discovery with Dynamic Client Registration - the extension will automatically handle OAuth flow and client registration.
Claude Web/Desktop
Use organization connectors with OAuth discovery enabled. Claude will automatically register via DCR and authenticate.
Claude Code
claude mcp add --transport http mcp-proxy https://your-mcp-proxy-url/mcp
The OAuth sidecar provides a unified authentication flow with automatic Dynamic Client Registration for all MCP clients.
Client Configuration Deployment
For enterprise environments, the project includes example deployment scripts to automatically configure MCP clients across multiple machines.
Automated Client Configuration
The client-config/deployment/ directory contains example scripts for deploying MCP configurations to client machines:
mcp-config-deployment.sh: Example macOS deployment script that:- Configures VS Code, IntelliJ, and Claude Desktop clients
- Sets up MCP server configurations with your proxy endpoint
- Handles proxy settings and environment variables
- Creates backups of existing configurations
- Supports multiple MCP servers (proxy, GitHub, Atlassian, Sentry, Playwright)
Key features of the deployment script:
- Multi-client support: Automatically detects and configures VS Code, IntelliJ GitHub Copilot, and Claude Desktop
- Environment variables: Configures HTTP/HTTPS proxy settings and no-proxy domains
- Backup management: Creates timestamped backups before making changes
- Idempotent operations: Safe to run multiple times, only updates when needed
- Logging: Comprehensive logging for troubleshooting and audit purposes
Usage example:
# Set your MCP proxy URL and run the deployment script
export MCP_PROXY_URL="https://your-mcp-proxy-url/mcp"
export HTTP_PROXY_URL="http://your-proxy-server:80"
export HTTPS_PROXY_URL="http://your-proxy-server:80"

./client-config/deployment/mcp-config-deployment.sh
This approach enables IT administrators to standardize MCP configurations across an organization and ensure all clients are properly configured to use the enterprise MCP proxy.
Current Status
✅ Production Ready: The MCP proxy system includes:
- OAuth 2.1 Sidecar: Unified authentication flow with automatic DCR support
- Enterprise Authentication: Google Workspace integration with comprehensive logging
- Multi-Client Support: Optimized for Claude Code, VS Code, Claude Web/Desktop
- AWS Deployment: Production CDK infrastructure with load balancing and auto-scaling
Known Limitations
⚠️ Google OAuth Refresh Token Limits:
Google OAuth 2.0 has a hard limit of 100 active refresh tokens per OAuth client. This means:
- Maximum concurrent users: 100 authenticated users per Google OAuth client
- Token behavior: When the 101st user authenticates, the oldest refresh token is automatically revoked
- Impact: Users with revoked tokens will need to re-authenticate
Solutions for larger deployments:
- Multiple OAuth clients: Create additional Google OAuth client IDs and distribute users across them
- Client rotation: Implement logic to rotate between multiple OAuth clients based on user count
- Session management: Consider shorter session durations to reduce long-term token usage
Monitoring recommendations:
- Track active refresh token count via Google Cloud Console
- Monitor authentication failures that might indicate token revocation
- Set up alerts when approaching the 100-user limit
For organizations with more than 100 concurrent users, you'll need to implement a multi-client OAuth strategy or consider alternative authentication approaches.
Authentication & Security Features
The OAuth 2.1 sidecar implements enterprise-grade authentication with:
- RFC Compliance: OAuth 2.1, OpenID Connect, DCR (RFC 7591), and Discovery (RFC 8414)
- Google Workspace Integration: Domain-restricted authentication
- Unified Authentication Flow: Consistent OAuth experience for all client types
- Comprehensive Logging: Authentication and activity audit trails
- Token Management: Secure caching and validation
Development
Quick Start
# Clone and install dependencies
git clone <repository-url>
cd qred-mcp-proxy
uv sync

# 🎯 RECOMMENDED: Install automated quality hooks
uv run pre-commit install

# Verify everything works
uv run pre-commit run --all-files
Local Development Setup
For detailed development guidelines, see CONTRIBUTING.md.
Building and Pushing
# Build and push to ECR
cd docker/mcp_proxy && ./build-and-push.sh --push
cd docker/mcp_oauth && ./build-and-push.sh --push
Documentation
- AWS Deployment Guide: Complete AWS setup and configuration
- OAuth 2.1 Implementation: OAuth sidecar service details
- MCP Proxy Service: Aggregated proxy server documentation
Configuration
The system uses environment-specific configuration files for different deployment stages:
- Development:
CONFIG_ENV=development npm run cdk deploy - Production:
CONFIG_ENV=production npm run cdk deploy - Default:
npm run cdk deploy
Each environment can have its own VPC, certificates, secrets, and service naming.
License
This project is licensed under the Apache License 2.0 - see the LICENSE file for details.
No comments yet
Be the first to share your take.