
PolyGate
Trade Polymarket from any LLM that speaks MCP.



PolyGate is a Model Context Protocol server that gives your AI agent Polymarket as a set of tools. Point any MCP-capable host (Claude Desktop, Claude Code, VS Code, Cursor, OpenClaw, …) at it, and your agent can:
- research markets — search, list, and read events, markets, and resolution rules;
- read live prices — order book, midpoint, spread, last trade, price history;
- inspect your account — positions, balance, portfolio value, orders, activity;
- trade — buy, sell, and manage real orders on your own Polymarket account.
It uses your Polymarket account. Researching and reading markets needs no credentials — run it key-free to explore. To let the agent trade, you supply two values (your funding address and signer key); PolyGate then signs orders, derives credentials, and detects your signature type for you — all in memory at startup. There's no HTTP server to run, no port to open, and no API key for the agent to manage. All your trades will also be visible on Polymarket.com, and you can use the site to manage your account as usual.
Real money. Once your funded wallet is configured, the trading tools spend real funds on your Polymarket account.
Quick start
There are two ways to give your AI PolyGate's tools — pick one:
- Connect a web AI — for AIs that run in a website (ChatGPT, Claude, Grok, …). Run one command and paste three values into the site. No config file to edit. Lowest barrier.
- Run as a local MCP server — for desktop/IDE hosts (Claude Desktop, Claude Code, VS Code, Cursor, OpenClaw). Add a small JSON block to the host's config.
Either way, the only tool you install is uv —
uvx. The web AI path needs one more tool, cloudflared —
covered in that section below.
curl -LsSf https://astral.sh/uv/install.sh | sh
Or with Homebrew: brew install uv.
curl -LsSf https://astral.sh/uv/install.sh | sh
powershell -ExecutionPolicy ByPass -c "irm https://astral.sh/uv/install.ps1 | iex"
Or with winget:
winget install --id=astral-sh.uv -e.
uvx (bundled with uv) fetches and runs PolyGate on demand — no clone, no
pip install.
Connect a web AI
For an AI that runs in a browser (ChatGPT, Claude, Grok, …), polygate connect
exposes PolyGate at a public HTTPS MCP URL with OAuth credentials — nothing to
configure in a file. It needs one extra dependency, cloudflared (the tunnel):
| OS | Install cloudflared |
|---|---|
| macOS | brew install cloudflared |
| Windows | winget install --id Cloudflare.cloudflared |
| Linux | Debian/Ubuntu: download Cloudflare's latest cloudflared-linux-amd64.deb and run sudo dpkg -i cloudflared-linux-amd64.deb; Fedora/RHEL: install the latest cloudflared-linux-x86_64.rpm with sudo rpm -i ... |
Optional first step — connect a wallet to enable trading. Skip this to stay research-only (search, prices, and market data need no wallet or keys). To let the web AI place real orders, connect your Polymarket wallet once:
uvx --from git+https://github.com/ilmari99/[email protected] polygate setup
Start the connector. For research and reading only:
uvx --from git+https://github.com/ilmari99/[email protected] polygate connect
If you connected a wallet above and want the AI to trade, add --allow-trading
(you'll be asked to type a confirmation phrase in the terminal before trading
turns on):
uvx --from git+https://github.com/ilmari99/[email protected] polygate connect --allow-trading
Either command starts a loopback MCP server, opens a temporary Cloudflare HTTPS tunnel, provisions OAuth credentials, and prints a connection card:
MCP URL / Server URL:         https://random.trycloudflare.com/mcp
Client ID / OAuth ID:         polygate-...
Client secret / OAuth secret: pg_secret_...   (treat this like a password)
Mode:                         RESEARCH ONLY
Paste the card's MCP URL, Client ID, and Client secret into your web AI's custom-connector screen:
- Claude: follow the step-by-step walkthrough below.
- ChatGPT: enable developer/custom connectors, add an MCP server, then use the card's MCP URL as the server URL and the Client ID / Client secret as the user-defined OAuth client.
- Grok: create a custom remote MCP connector, paste the MCP URL, and use the card's Client ID and Client secret for OAuth.
Add PolyGate to Claude (web)
Keep the polygate connect terminal open so its connection card stays visible,
then in claude.ai:
-
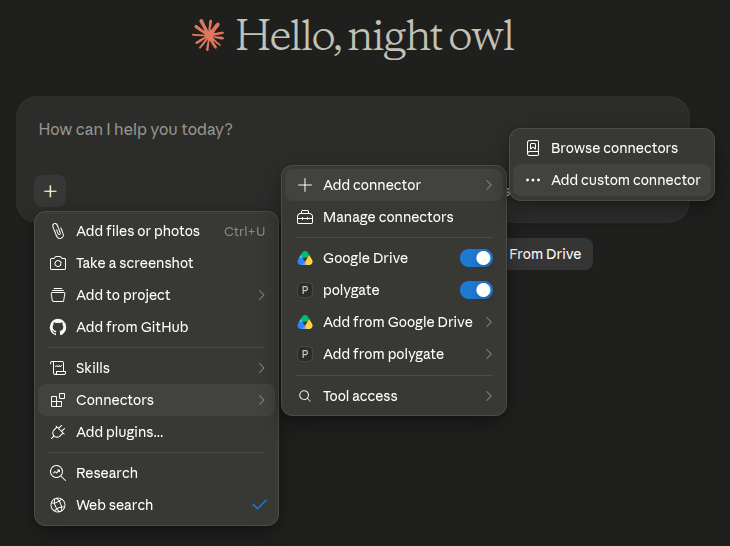
Click the + button at the bottom-left of the chat box, then choose Connectors → Add connector → Add custom connector.
-
In the dialog, paste the three values from the connection card: the MCP URL (e.g.
https://random.trycloudflare.com/mcp) as the server URL, and the Client ID and Client secret as the OAuth client credentials. Save. -
Open the + menu again and choose Connectors → Manage connectors, then click Connect next to polygate. Claude opens the authorization page — click Authorize to finish.
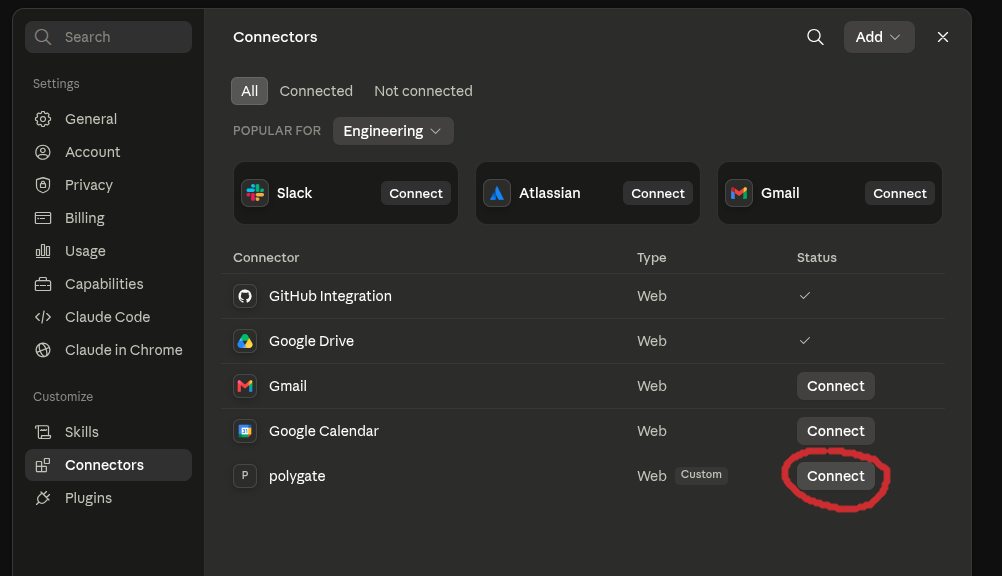
PolyGate's research tools now appear in Claude; if you started with
--allow-trading, the place/cancel-order tools appear too.
The command runs until Ctrl-C, which stops the tunnel and disconnects the web AI.
Re-running reuses the same OAuth credentials; use --new-credentials to rotate
them.
Run as a local MCP server
For a desktop or IDE host, add PolyGate to the host's MCP config. To research and read markets — no Polymarket account or keys needed — paste this in:
{
  "mcpServers": {
    "polygate": {
      "command": "uvx",
      "args": ["--from", "git+https://github.com/ilmari99/[email protected]", "polygate-mcp"]
    }
  }
}
Reload your host and the market-data, price, and research tools appear.
Add your wallet to trade
Credentials are needed only for trading. To let the agent place and cancel
orders on your Polymarket account, add an env block with two values from
polymarket.com:
- Funder address — Settings → Profile → Address (
0x…). - Private key — Settings → Account → Private Key. Keep it secret.
{
  "mcpServers": {
    "polygate": {
      "command": "uvx",
      "args": ["--from", "git+https://github.com/ilmari99/[email protected]", "polygate-mcp"],
      "env": {
        "FUNDER_ADDRESS": "0xYourFundingAddress",
        "PRIVATE_KEY": "0xYourSignerPrivateKey"
      }
    }
  }
}
These are environment variables your host passes to the PolyGate process; they stay in a local config file on your machine.
This mcpServers shape is the de-facto standard and works in Claude Desktop,
Claude Code, Cursor, and most MCP hosts. VS Code is the exception — see
Other hosts below.
Talk to your agent
Once the tools are loaded, just ask anything about Polymarket. For example:
- "Find the most-traded live markets right now."
- "Suggest markets where there is an edge and latest news havent been priced in correctly."
- "How is my portfolio performing?"
- "Buy 500 YES shares for France winning the World Cup."
Want the model to understand how to trade before it starts — Polymarket's tokens-vs-markets model, the price-is-probability idea, common footguns, and keeping a memory of what it learns — hand it
llm.md, an optional briefing written for the agent.
Navigating Polymarket
Polymarket has one containment and two cross-cutting groupings — PolyGate exposes each so an agent can find everything, not just what full-text search surfaces:
- Market — the atomic tradable question (a
0x…conditionId, itsclobTokenIds). Prices and orders are always per outcome token. - Event — a "market page" grouping one or more markets.
- Tags and Series — two independent groupings over events. Tags are flat
categories; a series is a recurring or multi-part set (each Fed decision, a
monthly BTC strike ladder, a tournament's fixtures).
gameIdis not a level — it is a sports-only attribute that a game's sibling events share.
Because Polymarket splits one topic across several separate events (a match's moneyline, spread, and totals are distinct events), opening one event or searching shows only a fragment. Two ways to navigate:
- Deepen:
list_tags/list_series→list_events(tag_id=/series_id=)→get_event→ its markets. - Flatten:
collect_markets(series_id=|tag_id=|event=)returns every atomic market under one scope in a single list. For a sports game,collect_markets(event=<slug>, group_by="gameId")gathers all its sub-markets at once.
How it works
Every tool is a thin wrapper over one in-process core, PolymarketService, which
owns all upstream access:
flowchart LR
    Host["Your MCP host\n(agent)"] -- "MCP tools (stdio)" --> Core["PolyGate core\n(PolymarketService)"]
    Core --> Gamma["Gamma API\n(markets, events)"]
    Core --> CLOB["CLOB API\n(book, orders — signed)"]
    Core --> Data["Data API\n(positions, activity)"]
Trading on Polymarket involves two addresses, and you provide both:
- Your signer (
PRIVATE_KEY) — an ordinary Ethereum keypair whose private key signs your orders. This is the key polymarket.com reveals under Settings → Account → Private Key; if you connected your own wallet, it's that wallet's key. Either way you don't need a new wallet. - Your funder (
FUNDER_ADDRESS) — the Polymarket account that actually holds your USDC and is the order maker. Your signer controls it; you never get a separate key.
At startup the core derives your CLOB API credentials from the signer key and
auto-detects your order signature type — whichever of proxy wallet, connected
(Safe) wallet, deposit wallet, or plain EOA holds your funds (you need to have funds) — so orders are signed
correctly with no on-chain setup, token allowances, or separate RPC. Because the
wallet is passed in fresh through the env block each start, these credentials are
derived in memory and never written elsewhere.
The core only reads market/account data and places orders. It does not manage your wallet, handle deposits or withdrawals, sign any transaction other than an order, or contain any trading logic. It's an abstraction over Polymarket's APIs so you can build your own agent, without losing any features inherent to the Polymarket platform.
Configuration
All settings are environment variables set in the env block of your MCP config
(as in the Quick start):
| Variable | Required | Description |
|---|---|---|
PRIVATE_KEY |
for trading | Signer key. Keep secret. |
FUNDER_ADDRESS |
for trading | The address that holds your funds and makes your orders. |
DRY_RUN |
no | true simulates orders without signing or sending them. |
LOG_LEVEL |
no | Logging level (default INFO). |
SIGNATURE_TYPE, CLOB_API_KEY, CLOB_SECRET, CLOB_PASSPHRASE |
auto | Derived/detected in memory at startup; set only to override. |
Market-data and research tools (list_markets, get_order_book, collect_markets,
search, get_holders, …) work without a wallet. Account and trading tools
(get_positions, get_balance, place_order, cancel_order, …) require
PRIVATE_KEY and FUNDER_ADDRESS. Use DRY_RUN=true to exercise place_order
safely.
Prices and orders are always per outcome token (
clobTokenId), never per market. A share pays $1 if its outcome happens and $0 if not, so a token's price is the market's implied probability.
Other hosts
The Quick-start JSON works as-is for Claude Desktop, Claude Code, Cursor, and most MCP hosts. Two cases differ:
VS Code (Copilot) uses a servers key (not mcpServers) and a type field.
Put this in .vscode/mcp.json, then reload the window:
{
  "servers": {
    "polygate": {
      "type": "stdio",
      "command": "uvx",
      "args": ["--from", "git+https://github.com/ilmari99/[email protected]", "polygate-mcp"],
      "env": {
        "FUNDER_ADDRESS": "0xYourFundingAddress",
        "PRIVATE_KEY": "0xYourSignerPrivateKey"
      }
    }
  }
}
Running your own checkout (while developing PolyGate): point --from at a
local path instead of the git URL — uvx --from /path/to/polygate polygate-mcp.
Optional: REST gateway for algorithmic trading
The same core is also exposed as a language-agnostic REST gateway (FastAPI),
for clients that aren't MCP hosts — e.g. an algorithmic trading bot in another
language that drives PolyGate over plain HTTP. It offers identical capabilities,
protected by a generated PLATFORM_API_KEY.
git clone https://github.com/ilmari99/polygate.git && cd polygate
python -m venv .venv && source .venv/bin/activate
pip install .
polygate        # serves http://127.0.0.1:8000, interactive docs at /docs
Connect your wallet at http://127.0.0.1:8000/setup (on your own machine) or with
polygate setup (remote/SSH), then drive it over HTTP.
examples/sample_agent.py is a runnable, dependency-free
reference for the read → decide → order loop, and the full endpoint reference is at
/docs once the server is running.
Development
git clone https://github.com/ilmari99/polygate.git && cd polygate
pip install ".[dev]"
pytest -q
The suite runs fully offline (HTTP is mocked) and exercises the DRY_RUN switch,
which simulates orders without signing or sending them.
Safety
- Your
PRIVATE_KEYcontrols your funds. It lives in theenvblock of your MCP config, in a local file on your own machine — that's fine; just don't commit a config file containing it to a shared or public repository. Exposing thePRIVATE_KEYpublicly risks your funds. - Trading tools spend real money once a funded wallet is configured. Keep
DRY_RUN=truewhile testing, and have your agent confirm orders before placing.
License
MIT — see LICENSE.
No comments yet
Be the first to share your take.