
Install
cargo install cloche
# or from git
cargo install --git https://github.com/escoffier-labs/cloche
What it does
| Job | What you get | |
|---|---|---|
| Capture | Any window or region | Desktop frames without a browser extension stack |
| Present | Polished share cards | README- and social-ready framing, not a raw dump |
| Emit | Stable JSON stdout | Shells, hotkeys, and agents can consume the result |
| Serve | Optional MCP | Expose capture to coding agents when you want it |
Examples
Same proof cards as the website: a GitHub README capture, polished onto two deep-space skies.
cloche polish shot.png --palette milkyway-core --scene sun --style-seed 3
cloche polish shot.png --palette carina-hubble --scene jwst --style-seed 42
Every card sits in a sky drawn from noise at render time. Pin a palette or a
telescope look; the same --style-seed reproduces one sky exactly:
cloche polish shot.png --palette horsehead-flame --scene alma --style-seed 7
See Space backdrops for the full palette and scene lists. Live Studio and more samples: cloche.escoffierlabs.dev.
Quick Start
Capture the active app or window as a Shot:
OUT=/tmp/cloche-demo
cloche capture --target active --out-dir "$OUT" --format json
Style an existing screenshot into a presentation card without recapturing:
cloche polish /tmp/diff.png --palette milkyway-core --format json
By default the card sits on a procedural deep-space scene. Pick one instead of letting the seed choose:
cloche polish /tmp/diff.png --scene jwst --style-seed 12345
See Space backdrops for the full list of looks.
Render an existing short recording through the experimental Remotion reel engine:
cd remotion && npm install && cd ..
cloche reels render \
--input raw.mp4 \
--out demo.mp4 \
--cues cues.json \
--title "Create a project"
The cue file follows the AppReels timeline shape:
{
"titleCard": { "text": "Create a project", "ms": 900 },
"captions": [{ "startMs": 1000, "endMs": 2600, "text": "Open the project menu" }],
"zooms": [{ "startMs": 1200, "endMs": 2400, "scale": 1.35, "x": 0.3, "y": 0.4 }],
"outroCard": { "text": "Done", "ms": 700 }
}
Zooms ease in and out on their own; x/y (0 to 1 across the footage,
optional) pick the focus point, defaulting to center.
Preview the latest capture:
cloche preview
Create a self-contained HTML gallery of recent Shots:
cloche gallery --root /tmp --html /tmp/cloche.html --title "My Shots" --open
Generate a Codex turn/start payload from a Shot (pass the out-dir, or a
<stem>.json sidecar):
cloche codex-payload --thread-id "$THREAD_ID" "$OUT"
Space backdrops
Every card is framed on a procedural deep-space scene generated from the style
seed. Nothing is a stock image: the nebulae, starfields, and objects are drawn
from noise at render time, so each seed is a different sky and the same
--style-seed reproduces one exactly.
Eight palettes are color-sampled from astrophotography of real objects, and a scene layers gas, dust lanes, starfields, and one or more focal objects on top:
- Nebulae: domain-warped clouds with bright ionization fronts and dark
dust lanes. Palettes:
orion-emission,carina-hubble,pleiades-reflection,rho-ophiuchi,milkyway-core,andromeda-haze,horsehead-flame,lagoon-trifid. - Telescope looks: roughly half of scenes take the JWST signature (6-point diffraction spikes, clumpy dust, blue-cored galaxies). Others echo ALMA protoplanetary discs, SDO extreme-UV suns with coronal loops, and Chandra supernova-remnant shells.
- Objects: spiral and edge-on dust-lane galaxies, ring and bipolar planetary nebulae, open clusters, gravitational-lensing arcs, and rare ultra-deep-field and Planck-CMB frames.
Twelve deep-space palettes are in the default random rotation. The nine
gradient palettes (violet-haze, ember-glow, aurora-teal, rose-noir,
midnight-sky, sea-glass, peach-dusk, ink-wash, citrus-noon) and the
six pattern palettes stay out of it unless you name them, either with
--palette or in the random pool.
Pin a look with --scene instead of rolling the seed:
cloche polish shot.png --scene alma
cloche polish shot.png --scene cmb --style-seed 42
Scenes: nebula, jwst, hubble, galaxy, alma, ring, butterfly,
edge-on, sun, sdo, cluster, deep-field, lensing, veil, remnant,
cmb. --scene applies only to space palettes. On a gradient palette it is a
no-op warning. --palette and --scene are available on cloche capture,
cloche polish, and the matching MCP tools.
Pattern backdrops
The third backdrop family: woven and ruled geometry, drawn from the seed the
same way the space scenes are. A pattern palette carries the colours and a
motif carries the structure, so --palette and --motif compose exactly like
--palette and --scene.
cloche polish shot.png --palette tartan-moss --motif plaid
cloche polish shot.png --palette blueprint --motif grid --style-seed 42
Pattern palettes: tartan-moss, oxford-navy, blueprint, ledger-cream,
picnic-red, workshop-ochre. The last two are light grounds, which give a
card a very different weight from the dark skies.
Motifs: plaid, gingham, stripe, rule, grid, diagonal, chevron,
dot, crosshatch, weave, herringbone, houndstooth. --motif applies
only to pattern palettes; on any other backdrop it is a no-op warning, the same
way --scene behaves off a space palette.
Nothing is a tiled bitmap. Plaid builds a mirrored tartan sett and crosses it both ways; houndstooth is derived from a 2/2 twill with a four-thread colour repeat, which is what actually grows the teeth. Both resolve cleanly at any card size.
How many backdrops there are
Palettes and second axes multiply:
| Family | Palettes | Second axis | Combinations |
|---|---|---|---|
| Deep space | 12 | 16 scenes | 192 |
| Pattern | 6 | 12 motifs | 72 |
| Gradient | 9 | none | 9 |
273 in all, and every seed varies the result again. cloche studio shows the
cross product: hover a backdrop and the scene or motif sheet redraws on it.
Backdrop Preferences
Pinning a look on every invocation gets old, so cloche config stores the
choice once and both capture and polish read it with no flags:
cloche config options # every palette (with kind) and scene
cloche config show # current preferences and where they live
# Always use one backdrop.
cloche config set --mode pinned --palette orion-emission --scene jwst
# Or keep it random, but only across the backdrops you like.
cloche config set --mode random --palettes carina-hubble,pleiades-reflection
cloche config set --scenes alma,veil
cloche config set --palettes tartan-moss,oxford-navy --motifs plaid,houndstooth
cloche config set --clear all # back to defaults
Preferences live at ~/.config/cloche/config.json
($XDG_CONFIG_HOME/%APPDATA% are honored, and CLOCHE_CONFIG overrides the
path outright):
{
"polish": {
"mode": "random",
"palette": null,
"scene": null,
"motif": null,
"palettes": ["carina-hubble", "pleiades-reflection"],
"scenes": ["alma", "veil"],
"motifs": ["plaid", "houndstooth"]
}
}
modeisrandomorpinned.pinnedappliespalette/scene;randomleaves them on file and draws from the pools instead.palettes,scenes, andmotifsare the random pools. Empty means no constraint: every deep-space palette, and the seed's own scene or motif pick. Naming a gradient or pattern palette here is the only way to get those families into the random rotation.- Precedence is flag, then config, then the built-in random pick, so a one-off
--palettealways wins. - A missing file means defaults. A malformed one is reported in the result's
warningsand falls back to defaults rather than costing you the capture.
cloche config show and cloche config options emit the same JSON contract as
every other command (cloche schema --for config).
cloche studio
If you would rather see the backdrops than read their names:
cloche studio # http://127.0.0.1:4317
cloche studio --port 0 # let the OS pick a port
cloche studio --print-url # print the URL as JSON and exit
A local page showing every backdrop and scene as a real render. Click to switch
one in or out of the random pool, or switch to Pin one to lock a single
backdrop. Changes are written to the same config.json the CLI reads, and the
page shows the equivalent cloche config set for whatever you have selected.
The hero preview uses your newest capture, so the page will display whatever you last screenshotted. Worth knowing before you screen-share it.
It binds to 127.0.0.1 by default and has no authentication, because anything
that can reach the port can rewrite your styling config. --host widens that:
only use it on a network you trust.
Command Reference
cloche doctor --format json
cloche list-windows --format json
cloche capture --target active --presentation both --format json
cloche capture --target active --detail high --style-seed 12345 --out-dir /tmp/cloche-demo --format json
cloche capture --target screen --out-dir /tmp/cloche-demo --format json
cloche capture --target window --title Firefox --out-dir /tmp/cloche-demo --format json
cloche capture --target window --window-id 0x3400003 --out-dir /tmp/cloche-demo --format json
cloche capture --target window --app firefox --out-dir /tmp/cloche-demo --format json
cloche capture --target region --presentation both --clipboard --out-dir /tmp/cloche-demo --format json
cloche capture --target active --palette orion-emission --scene jwst --out-dir /tmp/cloche-demo
cloche polish /tmp/diff.png --format json
cloche polish /tmp/diff.png --out /tmp/diff-card.png --palette ember-glow --scene jwst --style-seed 12345
cloche reels render --input raw.mp4 --out demo.mp4 --cues cues.json --title "Create a project"
cloche reels render --engine hyperframes --input raw.mp4 --out demo.mp4 --cues cues.json \
--palette ember-glow --style-seed 12345 --fps 60 --width 1080 --height 1920 --workers 1
cloche config show
cloche config options
cloche config set --mode pinned --palette orion-emission --scene jwst
cloche config set --mode pinned --palette tartan-moss --motif houndstooth
cloche config set --mode random --palettes carina-hubble,pleiades-reflection
cloche config set --motifs plaid,gingham,houndstooth
cloche config set --clear all
cloche studio
cloche studio --port 0 --print-url
cloche gallery --limit 10
cloche gallery --root /tmp --html /tmp/cloche.html --title "My Shots" --open
cloche latest
cloche preview
cloche open /tmp/cloche-demo
cloche schema
cloche schema --for polish
cloche schema --for reel-render
cloche schema --for config
cloche codex-payload --thread-id THREAD_ID /tmp/cloche-demo
cloche codex-payload --thread-id THREAD_ID --card /tmp/cloche-demo
cloche mcp
cloche setup
cloche setup --print
cloche setup hotkey
cloche setup agent --client claude-code
cloche setup verify --format json
Omit --out-dir on capture to write into the default gallery (~/Pictures/Cloche).
The old appshots command remains as an alias for the same code path.
Modes
Shots are available now. A Shot is a still capture with raw and presentation images, metadata, and optional extracted text.
Reels ship an experimental render path today: cloche reels render takes an
existing MP4 plus AppReels-shaped cue JSON and outputs a framed vertical reel
(--engine remotion or --engine hyperframes). Desktop record capture and
the rest of the Reels workflow are still planned; see ROADMAP.md.
GIF export is planned after the Reels capture path. GIFs will be generated from finished Reels as a delivery format, not recorded as the primary source.
Why Cloche Exists
OpenAI documents Appshots as a macOS app feature for Codex. The Codex repository can already resume threads that contain local images through app-server v2 turn/start input:
{ "type": "localImage", "path": "/absolute/path/to/shot.png", "detail": "high" }
Linux and Windows users still need a reliable way to create those captures from a normal CLI. Cloche fills that capture side while staying independent of any one agent stack. Use it with Codex, OpenClaw, Claude Code, Hermes, a local MCP client, or a plain shell script.
Reference: https://developers.openai.com/codex/appshots
Output Files
By default each capture writes flat files into ~/Pictures/Cloche (override
with --out-dir). Files share one stem (cloche-shot-<UTC>Z-<pid>-<n>):
<stem>.png, the shareable card (or the raw shot when--presentation raw).<stem>.raw.png, the raw capture when a card owns<stem>.png.<stem>.json, the same JSON object printed to stdout.<stem>.txt, optional best-effort accessible text from the focused app.
Legacy folder-per-shot captures (shot.png, shot-card.png, metadata.json,
text.txt) are still readable by gallery, latest, and preview.
Capture exits with 0 only when a raw image was written. Text extraction and presentation-image failures are warnings because accessibility support and desktop compositing vary by toolkit, app, desktop environment, and OS. --target screen exists as a fallback and debugging mode. --target active is the default.
Use --presentation raw, --presentation card, or --presentation both to control output image generation. Use --style-seed <number> to reproduce a randomized card style exactly. Use --detail high|low|auto|original for the Codex localImage detail hint stored in metadata.
--target region opens an interactive selector (Flameshot when available, ImageMagick import drag-select on X11): drag a rectangle and the shot is taken the moment you release. Add --clipboard to copy the finished card straight to the clipboard (wl-copy on Wayland, xclip on X11). Clipboard copy is not supported on Windows yet; the flag records a warning and the capture still succeeds. Region capture needs a human at the desk; it is not for headless agents. Region select itself is also not yet supported on Windows: use Win+Shift+S, save the file, then cloche polish <file>.
Hotkey Workflow
Bind one key to get a share-ready card on your clipboard: press it, drag a region, paste the polished card anywhere. The capture, polish, and clipboard copy all happen in cloche; only the key binding is set up per desktop.
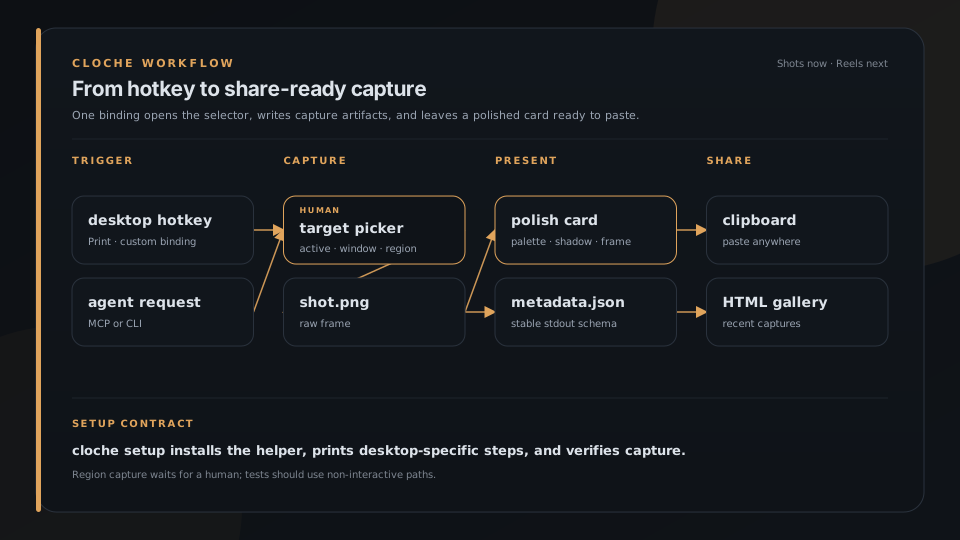
Generated from docs/assets/workflows/hotkey.json with plating workflow.
The fastest path is one command:
cloche setup
It installs cloche-grab, binds it to Print on GNOME (and prints the exact
steps on KDE/sway/i3), registers the MCP server with any agent it detects, then
verifies that capture, the hotkey, and the MCP server actually work. Run
cloche setup --print to preview every change first, or cloche setup verify
any time to re-check. The manual steps below are what cloche setup automates,
and the fallback for unsupported desktops.
The repo ships scripts/cloche-grab.sh, which wraps the capture and adds a
desktop notification. Install it and bind it:
# 1. Put the script on your PATH (or point the binding at it in place).
install -Dm755 scripts/cloche-grab.sh ~/.local/bin/cloche-grab
# 2. Confirm it works (it opens the region selector):
cloche-grab
Then bind cloche-grab to a key:
- GNOME: Settings -> Keyboard -> View and Customize Shortcuts -> Custom
Shortcuts -> +. Name it "Cloche Grab", command
cloche-grab, and set the shortcut (e.g. Print). To move the native screenshot UI off Print first:gsettings set org.gnome.shell.keybindings show-screenshot-ui "['<Shift>Print']". - KDE: System Settings -> Shortcuts -> Custom Shortcuts -> Edit -> New ->
Global Shortcut -> Command/URL, command
cloche-grab, then assign a key. - Anything else (sway, i3, ...): bind a key to
cloche-grabin your WM config.
Prefer no script? Bind this one-liner directly instead:
cloche capture --target region --presentation both --clipboard
cloche polish writes a single card PNG (<input>-card.png next to the
input by default, or --out <path>; it must end in .png). Its stdout JSON
reports input, card, and presentationStyle.
Agent Use
Any shell-capable agent can call:
OUT=/tmp/cloche-demo
cloche capture --target active --out-dir "$OUT" --format json
Then parse image.path from stdout or read the generated <stem>.json sidecar
in $OUT. image.path is the raw frame (<stem>.raw.png when a card was
written); the polished card lives at presentationImage.path.
Codex app-server clients can turn a capture into a ready turn/start payload.
By default codex-payload attaches that raw frame (the unstyled pixels). Pass
--card to attach the polished presentation image instead:
cloche codex-payload --thread-id "$THREAD_ID" "$OUT"
cloche codex-payload --thread-id "$THREAD_ID" --card "$OUT"
Other agents should treat Cloche as a normal subprocess tool. The core command has no MCP dependency, desktop-app dependency, or agent-specific runtime dependency.
MCP Server
cloche mcp runs a minimal stdio MCP server for clients that prefer the Model Context Protocol over direct subprocess calls. It speaks newline-delimited JSON-RPC 2.0 on stdin/stdout and exposes capture, polish, list_windows, doctor, latest, and gallery as tools. Each tool call shells out to the same binary, so the JSON contract is identical to the CLI.
cloche setup agent registers this server with Claude Code, OpenClaw, and Codex CLI automatically (backing up any config it edits, and skipping clients already configured). The manual config below is for other clients or if you prefer to wire it yourself.
Register it like any stdio MCP server:
{
  "mcpServers": {
    "cloche": { "command": "cloche", "args": ["mcp"] }
  }
}
Compatibility config:
{
  "mcpServers": {
    "appshots": { "command": "appshots", "args": ["mcp"] }
  }
}
Linux Backend Notes
- X11 active/window capture uses
xdotool/wmctrlfor window metadata and ImageMagickimportfor PNG capture, withgnome-screenshot/scrotfallbacks for active-window when available. list-windowsrequires X11DISPLAYandwmctrl; withoutwmctrlit returnsok: falseand an error (it does not soft-degrade).- Wayland wlroots screen capture uses
grim. Region select prefersflameshot. - GNOME/KDE Wayland may block silent active-window capture by design. Use
--target screenor runcloche doctor --format jsonfor diagnostics. - Text extraction is best-effort through AT-SPI using Python GI when available.
If you are invoking Cloche from SSH, a TTY, or an agent process that did not inherit the desktop environment, Cloche will try to discover the live desktop variables from desktop processes. On GNOME X11 they usually look like:
export DISPLAY=:1
export XAUTHORITY=/run/user/$(id -u)/gdm/Xauthority
export DBUS_SESSION_BUS_ADDRESS=unix:path=/run/user/$(id -u)/bus
export XDG_SESSION_TYPE=x11
You can discover the active values from a desktop process:
tr '\0' '\n' </proc/$(pgrep -u "$(id -u)" -n gnome-shell)/environ | grep -E '^(DISPLAY|XAUTHORITY|DBUS_SESSION_BUS_ADDRESS|XDG_SESSION_TYPE)='
Windows Backend Notes
- Active/window capture uses Win32 foreground-window and top-level-window metadata, then captures the target window with
PrintWindowso covered windows are not polluted by whatever is on top. It falls back to.NET CopyFromScreenifPrintWindowis unavailable for that window. - Screen capture uses the Windows virtual screen.
- Text extraction is best-effort through UI Automation.
--clipboardis not implemented on Windows yet (warning only; capture still succeeds).- Capture must run in a logged-in interactive desktop session. Plain OpenSSH sessions can build and run
doctor, but Windows blocks screen capture from the non-interactive SSH service session.
Gallery HTML Export
cloche gallery --html <path> writes a single self-contained HTML file with each capture's image embedded inline, so the result can be shared without any companion files. Combine with --root, --limit, --title, and --open. The JSON output gains an htmlPath field pointing at the written file.
Release Packaging
Build a local release archive:
bash scripts/package-release.sh
On Windows:
powershell -ExecutionPolicy Bypass -File scripts/package-release.ps1
Archives are written under dist/. Tagged GitHub releases are packaged by .github/workflows/release.yml for Linux and Windows.
Why not other screenshot tools?
- Flameshot, Spectacle, GNOME Screenshot, Greenshot, ShareX are excellent interactive GUI tools, built for a human clicking and annotating. They do not present a stable command surface for scripts, they do not emit machine-readable JSON, and they do not run headless from an agent process. Cloche is CLI-first and JSON-first; it uses tools like Flameshot for the region-select step but owns the polish, metadata, and contract.
grim/scrot/ ImageMagickimport/maimcapture pixels and stop there. You still hand-roll the framing, the gradient, the metadata, and the JSON. Cloche wraps the same low-level capture and does the rest in one command.carbon-now,silicon,ray.somake beautiful cards out of source code or arbitrary images, not live windows. Cloche captures the actual app and then frames it, andcloche polish <image>covers the "I already have a screenshot" case.- The macOS Appshots app for Codex is the inspiration, but it is macOS-only and tied to one agent stack. Cloche fills the same capture role on Linux and Windows while staying agent-neutral: use it with Codex, OpenClaw, Claude Code, Hermes, any MCP client, or a plain shell script.
What Cloche is not
Cloche is a local capture tool, not a service or an annotation suite.
It does not:
- run a background daemon, tray app, or scheduler
- upload, sync, or phone home with your captures
- annotate, blur, or redact (it frames what is on screen; review before you share)
- record audio or do OCR (text extraction is best-effort via the OS accessibility layer only)
- replace your editor or your sharing host; it writes local files and a JSON receipt, and you take it from there
Roadmap
See ROADMAP.md.
No comments yet
Be the first to share your take.