
AI Agent Playwright + TypeScript Automation Framework Template
Production-ready Playwright test automation starter for teams and startups: strict TypeScript, Page Object Model, environment management, interactive runner, custom HTML reporting (with optional JIRA integration), quality tooling, CI/CD patterns, and agentic (MCP-ready) extensibility.
Playwright Docs · TypeScript · ESLint · Prettier · Husky . Research articles
Table of Contents
- Why This Framework
- Features Overview
- Tech Stack
- Prerequisites
- Quick Start
- Project Structure
- Environments & Configuration
- Running Tests (Scripts)
- Interactive Custom Test Runner
- Tagging Strategy
- Page Object Model (POM)
- Configuration Hub (
configuration.ts) - Custom HTML Reporting
- Logging
- Code Quality: Prettier / ESLint / Husky
- TypeScript Configuration
- CI/CD Jenkins Pipeline
- Writing & Extending Tests
- AI Agent & Playwright MCP Integration
- Troubleshooting
- Security & Secrets
- License
- Contributor Details
Why This Framework
Instead of spending days wiring up Playwright from scratch, this template gives you:
- Opinionated yet flexible structure - Follows POM design pattern
- Unified configuration & environment variable loading
- A powerful interactive test runner that composes Playwright commands for you
- Rich custom HTML report with JIRA bug creation links & embedded artifacts
- Tag‑driven selective execution (regression, smoke, customer, internal)
- First‑class logging, helper utilities, and mock data
- CI pipeline (Jenkins) example using official Playwright docker image
Features Overview
| Area | Capability |
|---|---|
| Test Types | UI, API (E2E slot reserved for future) |
| Architecture | Page Object Model for UI/API pages |
| Environment Handling | .env per environment via dotenv + loadEnv() |
| Single Config Hub | utils/configuration.ts serves as the central config hub that defines environments, browsers, test types, tags, run modes, and JIRA constants to enable custom test execution and seamless JIRA–Jenkins integration. |
| Tagging | Regression, Smoke, Customer, Internal (via TAGS enum) |
| Custom Runner | Interactive CLI: choose env, browser(s), test type(s), tags, mode (headed / debug / ui) to enable dynamic test execution through interactive prompts. |
| Reporting | Playwright built‑in HTML + Custom consolidated HTML (donut chart, steps, JIRA integration) |
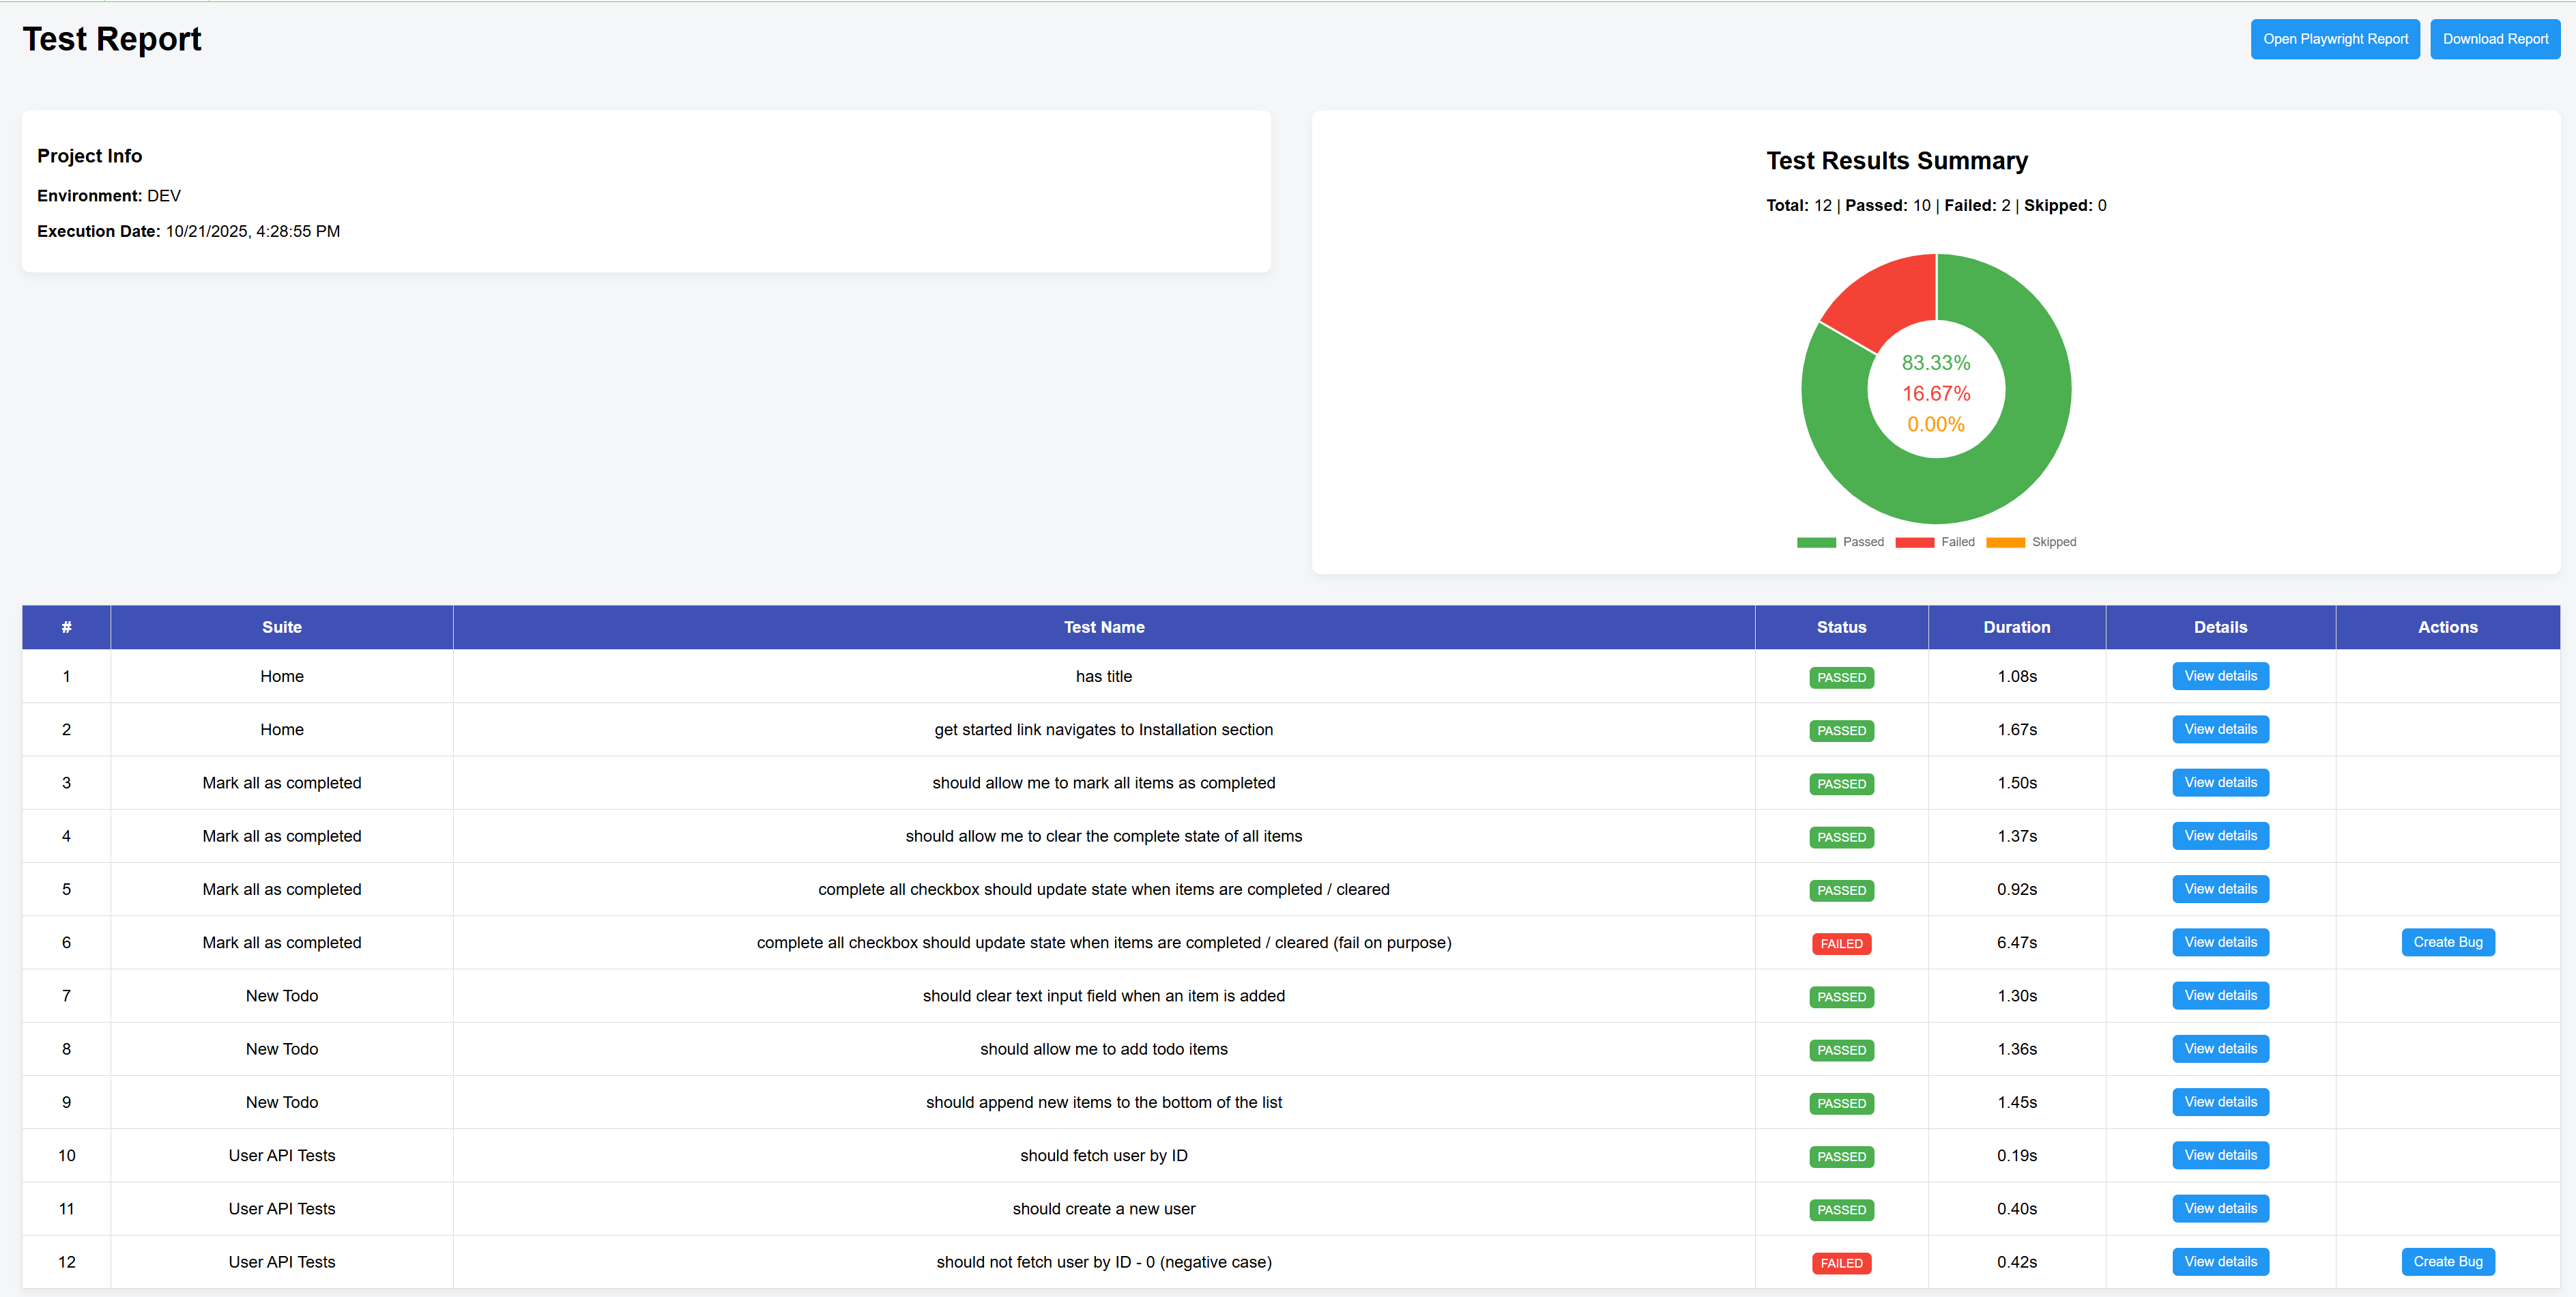
| Jenkins dashboard | Dashboard for details on test execution, integrated with playwright report for more details and Create bug option to directly create jira bug with auto-populated details including link to screenshot, videos and traces in the configured project |
| JIRA Hooks | One‑click “Create Bug” buttons (IDs configurable in configuration.ts) for Jenkins dashboard |
| Logging | File + console logger (Logger class) writes to logs/automation.log |
| CI | Jenkins pipeline with Dockerized Playwright execution & HTML publish + Github actions for code-quality check and running tests |
| Code Quality | Prettier, ESLint, TypeScript strict, Husky + lint‑staged on commit |
| Trace Artifacts | Screenshots, videos & traces retained on failure |
| Agentic Ready | Integrated Playwright MCP and Playwright agents |
Tech Stack
- Playwright Test (
@playwright/test) - TypeScript (Strict mode)
- Node.js (LTS recommended)
- Dotenv for environment variable loading
- Inquirer for interactive CLI test runner
- Prettier + ESLint + Husky + lint‑staged for quality gates
- Jenkins (example pipeline) / HTML publisher plugin
Prerequisites
Before you start, ensure the following:
- Install Visual Studio Code
- Install Git
- Install Node.js
- Download and install Node.js from here.
- Verify:
git --version
node -v
npm -v
Optional: VS Code + Playwright extension.
Quick Start
Windows PowerShell examples (
powershell.exe)
- Clone:
git clone https://github.com/twinklejoshi/ai-agent-playwright-typescript-template.git
cd ai-agent-playwright-typescript-template
- Install & provision browsers:
npm run setup
- (Optional) Create environment files (see below) then run tests:
npm run test            # All tests headless, default env=example
npm run test:local      # Explicit local env
- Launch interactive runner:
npm run test:custom
- View Playwright report after a run:
npm run test:report:playwright
- View custom report:
npm run test:report:custom
Project Structure
├── eslint.config.mjs
├── Jenkinsfile
├── package.json
├── playwright.config.ts
├── tsconfig.json
├── environments/
│   ├── local.env  (add your own)
│   ├── dev.env    (add your own)
│   ├── qa.env     (add your own)
│   └── example.env (sample)
├── utils/                # Cross-cutting utilities outside src
│   ├── configuration.ts  # Central config file for all config (TAGS, browsers, Jira, etc.) in the project
│   ├── custom-reporter.ts # Custom HTML report generator - generate a simple report and Jenkins dashboard
│   ├── env-loader.ts #Environment loading logic
│   └── run-custom-tests.ts # CLI interactive runner
└── src/
    ├── pages/
    │   ├── ui/           # UI POM classes
    │   └── api/          # API abstraction classes
    ├── shared/
    │   ├── mock-data/    # Test data (e.g., todo items, user prototypes)
    │   ├── types/        # Reusable TS types
    │   └── utils/        # Helpers (logger, local storage checks)
    └── tests/
        ├── ui/           # UI specs & fixtures
        └── api/          # API specs
        └── e2e/          # (Create for end-to-end flows)
Note: Imports like
@utils/configurationreference rootutils/. If you add more aliases, updatetsconfig.jsonpaths accordingly (see TypeScript Configuration).
Environments & Configuration
Located under environments/. Create one file per target: local.env, dev.env, qa.env (an example.env is provided as a fallback reference). Loader implementation (utils/env-loader.ts):
export const loadEnv = (env: string = 'example') => { /* resolves environments/<env>.env via dotenv */ };
playwright.config.ts calls:
loadEnv(process.env.NODE_ENV || 'example');
Usage pattern:
npx cross-env NODE_ENV=local playwright test --grep "@smoke"
Sample local.env:
environment=local
BASE_URL=https://local.example.com
USERNAME=test_user
PASSWORD=test_pass
Access with process.env.BASE_URL.
If a specified file is missing, adjust the default parameter or create the file to avoid silent misconfiguration.
Adding New Variables
- Add to each
<env>.env - Reference anywhere via
process.env.MY_VAR. - For CI Jenkins pipeline, set/inject using credentials bindings (see Jenkinsfile).
Running Tests (Scripts)
| Script | Purpose |
|---|---|
npm run test |
All tests headless (default env) |
npm run test:local / test:dev |
Force specific environment |
npm run test:headed |
Run in headed browsers |
npm run test:ui |
Launch Playwright UI runner |
npm run test:debug |
Debug mode (slow-mo inspector) |
npm run test:trace |
Enables trace collection |
npm run test:custom |
Interactive multi-select runner |
npm run test:report:playwright |
Open last Playwright HTML report |
npm run test:report:custom |
Open custom consolidated report |
Artifacts (screenshots, videos, traces) retained only on test failure (retain-on-failure).
Interactive Custom Test Runner
npm run test:custom
The test:custom command runs the run-custom-tests.ts script. The run-custom-tests.ts script is an interactive tool for flexible test execution. It allows you to select the environment, browser, test type, test group and test mode. Based on your choices, it dynamically constructs and runs the appropriate Playwright command, simplifying custom test runs without manual configuration changes.
Usage Example
To run the custom test flow:
- Execute the script:
npm run test:custom - Follow the prompts to select your environment, browser, test type, test group and test mode.
- The script will execute the selected tests and display the output.
For more details on how the script works, refer to Custom Test Script: run-custom-tests.ts.
Custom Test Script: run-custom-tests.ts
The run-custom-tests.ts script enables dynamic test execution through interactive prompts. It allows users to select the following options:
-
Environment:
- Select an environment:
LocalDevQA
- Select an environment:
-
Browser:
- Select the browser:
ChromiumFirefoxWebKit
- Select the browser:
-
Test Type:
- Specify the type of tests:
APIUIE2E
- Specify the type of tests:
-
Test Group:
- Filter tests by tag:
RegressionSmoke
- Filter tests by tag:
-
Test Mode:
- Filter tests by tag:
HeadlessUI
- Filter tests by tag:
Sample Command Generated by Script If the user selects:
- Environment:
QA - Browser:
Chromium - Test Type:
UI - Test Group:
Regression - TestMode:
Default => Headless
The generated command will look like:
npx cross-env NODE_ENV=local playwright test --project=chromium .src/tests/ui --grep "@regression"
The script dynamically builds this command, ensuring flexible and efficient test execution.
Tagging Strategy
Tags are defined in utils/configuration.ts enum TAGS:
export enum TAGS {
	REGRESSION = "@regression",
	SMOKE = "@smoke",
	CUSTOMER = "@customer",
	INTERNAL = "@internal",
}
Apply tags per test via metadata:
test("create todo", { tag: [TAGS.REGRESSION, TAGS.CUSTOMER] }, async ({ ... }) => { /* ... */ });
Filter execution using --grep "@regression" or combined with OR using pipes from custom runner.
Add new tags: extend TAGS, then insert into TEST_GROUPS for interactive selection.
Page Object Model (POM)
The Page Object Model (POM) is utilized for organizing UI, API, and end-to-end test files. Each application page or endpoint is represented by a class or module, enabling a clean separation of concerns and improving maintainability.
Core Components:
- Pages: Represents the application's UI pages or API endpoints. Contains all related elements and actions.
- Tests: Contains test scripts to validate functionality by using methods from the
pages. - Utils: Provides shared helpers, mock data, constants, and utilities.
Detailed Folder Descriptions
1. shared Folder
- Purpose: Stores shared resources and logic that can be used across all projects.
- Structure:
- mock-data: Contains test data which can be used to validate functionalities
- Example:
export const projectMockData: Project = {
    name: "New Project - Test 1",
    description: "New Project - Description",
    type: "Default",
    group: "new_group",
    coordinates: [],
};
- Example:
- types: Contains types.
- Example:
export type Project = {
    name: string;
    description: string;
    type: string;
    group: string;
    coordinates: Coordinates[];
};
- Example:
- utils: Provides custom logger, global helper functions or utility scripts, e.g., data formatting methods or mock generators or api utils.
- custom-logger.ts file contains implementation of logger functionality that helps in recording steps taken to execute each tests.
- mock-data: Contains test data which can be used to validate functionalities
2. Pages:
-
ui: Contains classes to model individual pages/components and includes methods to interact with page elements (e.g., clicking buttons, entering text, validating UI elements).- Example:
class LoginPage {
    async enterUsername(username) { await page.locator('#username').fill(username); }
    async enterPassword(password) { await page.locator('#password').fill(password); }
    async clickLogin() { await page.locator('#loginBtn').click(); }
}
- Example:
-
api: Manages API endpoint interactions with reusable methods.- Example:
class UserAPI {
    getUser(userId) { /* API call logic */ }
    createUser(data) { /* API call logic */ }
}
- Example:
3. Tests:
ui: Contains test scripts for UI components and interactions.- Example:
test('login form validation', async () => {
    await loginPage.enterUsername('user');
    await loginPage.enterPassword('');
    await loginPage.clickLogin();
    expect(await loginPage.errorText).toBe('Password is required');
});
- Example:
e2e: Implements end-to-end testing scenarios to validate workflows.- Example:
test('create project', async () => {
    await loginPage.login('user', 'password');
    await projectPage.createProject({ name: 'New Project', type: 'default' });
});
- Example:
api: Validates API responses, status codes, and workflows.- Example:
test('should fetch user details', async () => {
    const user = await userApi.getUser(1);
    expect(user.name).toBe('John Doe');
});
- Example:
Details of Pages and Tests
What Pages Will Include:
- Web Elements: Locators for UI elements or endpoints for APIs.
- Example (for UI):
this.loginButton = page.locator('#loginBtn');
- Example (for UI):
- Actions: Methods for interacting with the elements (e.g.,
clickLogin(),enterUsername()). - Reusable Functions: Methods for common tasks like navigation or API requests.
What Tests Will Include:
- Scenario Definitions: Scripts to validate specific functionalities or workflows.
- Example: "Verify that the user can log in successfully."
- Assertions: Checks to validate expected outcomes.
- Example:
expect(page.url()).toBe('https://example.com/dashboard');
- Example:
- Setup and Teardown: Initialization and cleanup code to prepare the test environment. This can be moved to fixtures folder. Fixtures encapsulates setup/teardown, are reusable beween test files and can help with grouping
Configuration Hub (configuration.ts)
Purpose
utils/configuration.ts is the canonical source for selectable dimensions of a test run (environment, browser, test type, grouping/tag, execution mode) and external integration constants (JIRA). Centralization avoids script divergence and enables dynamic CLI building.
Exposed Structures
| Constant | Shape | Usage |
|---|---|---|
TAGS |
enum |
Standard tag values used directly in test metadata (tag: field). |
ENVIRONMENTS |
Array<{ name; value }> |
CLI prompt options -> mapped to NODE_ENV. |
BROWSERS |
Array<{ name; value }> |
Translated to repeated --project=<browser> flags. |
TEST_TYPES |
Array<{ name; value }> |
Builds path segments .src/tests/<type> for selective directory runs. |
TEST_GROUPS |
Array<{ name; value }> |
Values come from TAGS (used to assemble --grep). |
MODES |
Array<{ name; value }> |
Appended to the final command (empty string = default headless). |
JIRA_* constants |
Numeric/string placeholders | Consumed by custom reporter to construct create-issue URLs. |
How the Runner Uses It
In run-custom-tests.ts answers from inquirer map directly:
const browserScriptParam = answers.selectedBrowser.map(b => `--project=${b}`).join(' ');
const testTypeParams = answers.selectedTestType.map(t => `.src/tests/${t}`).join(' ');
const testGroupParam = answers.selectedTestGroup.join('|');
With these pieces the final command is assembled (mode appended last). This makes adding a new browser or tag a one-line change in configuration.ts.
Adding a New Dimension
- Add new enum/array entry (e.g.,
TAGS.PERFORMANCE = '@performance'). - Extend
TEST_GROUPSwith a{ name: 'Performance', value: TAGS.PERFORMANCE }entry. - Use tag in test titles or metadata.
- Rerun
npm run test:custom– new option appears automatically.
JIRA Integration Details
Reporter reads IDs/base URL to construct CreateIssueDetails link parameters. After providing real IDs:
| Variable | Description | Example |
|---|---|---|
JIRA_PROJECT_ID |
Project numeric ID | 10201 |
JIRA_PROJECT_ISSUE_TYPE_ID |
Issue type ID (Bug, Task) | 10004 |
JIRA_API_BASE_URL |
Base instance URL | https://example.atlassian.net |
Failure rows display a "Create Bug" button which encodes test metadata (steps, attachments paths, error) into the generated link.
Environment + Path Alias Context
Imports like import { HomePage } from 'pages/ui'; rely on tsconfig.json path mapping ("*": ["./src/*"]) enabling shorthand module resolution. This reinforces portability in agent-based code generation (agents can infer domain boundaries from folder names).
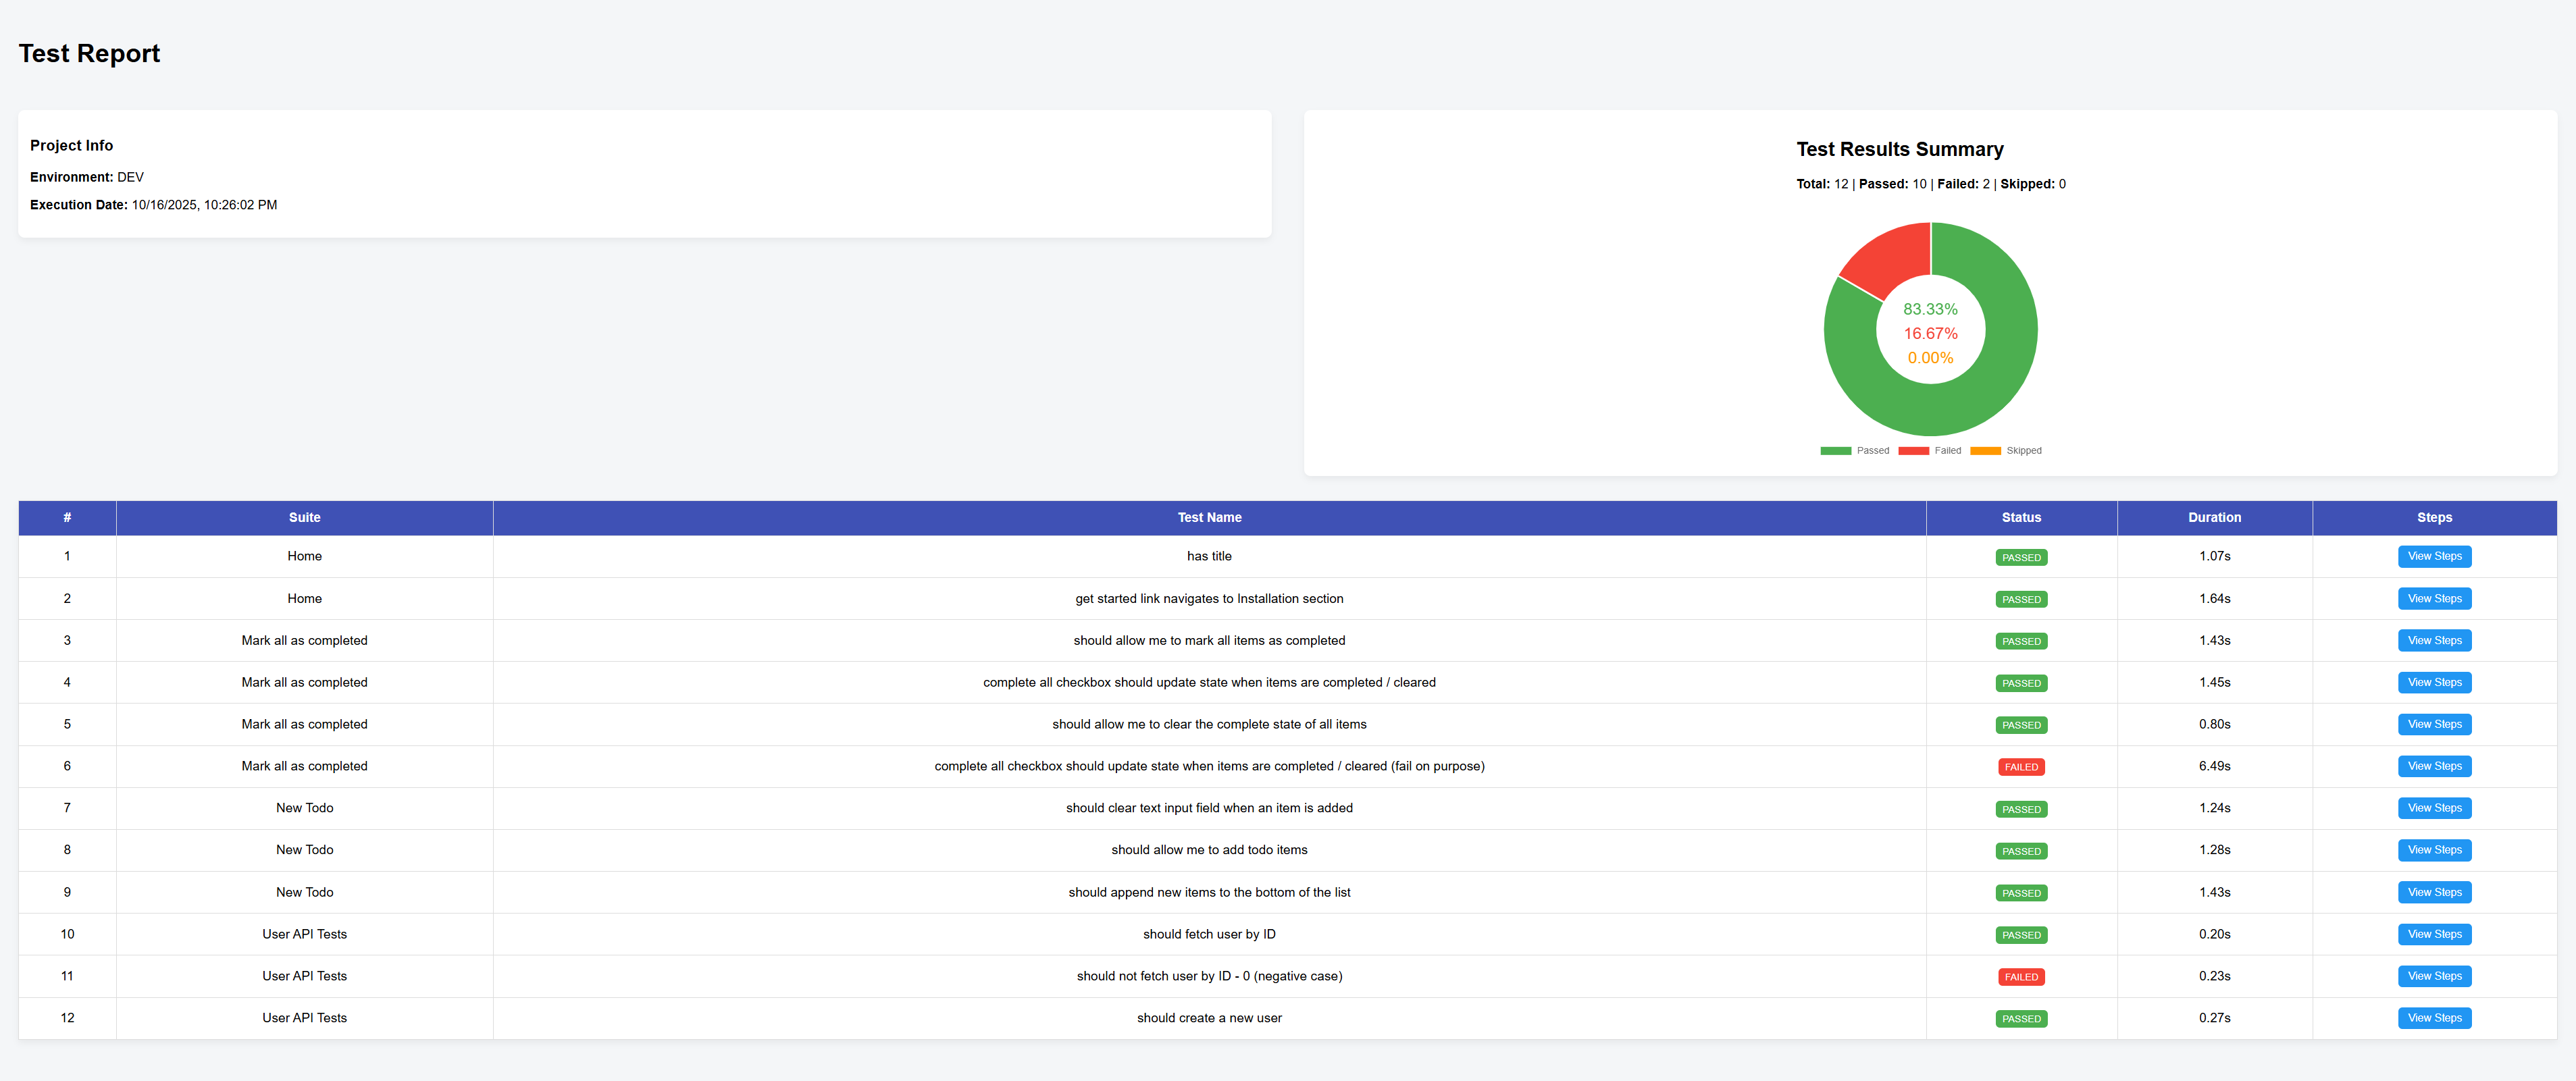
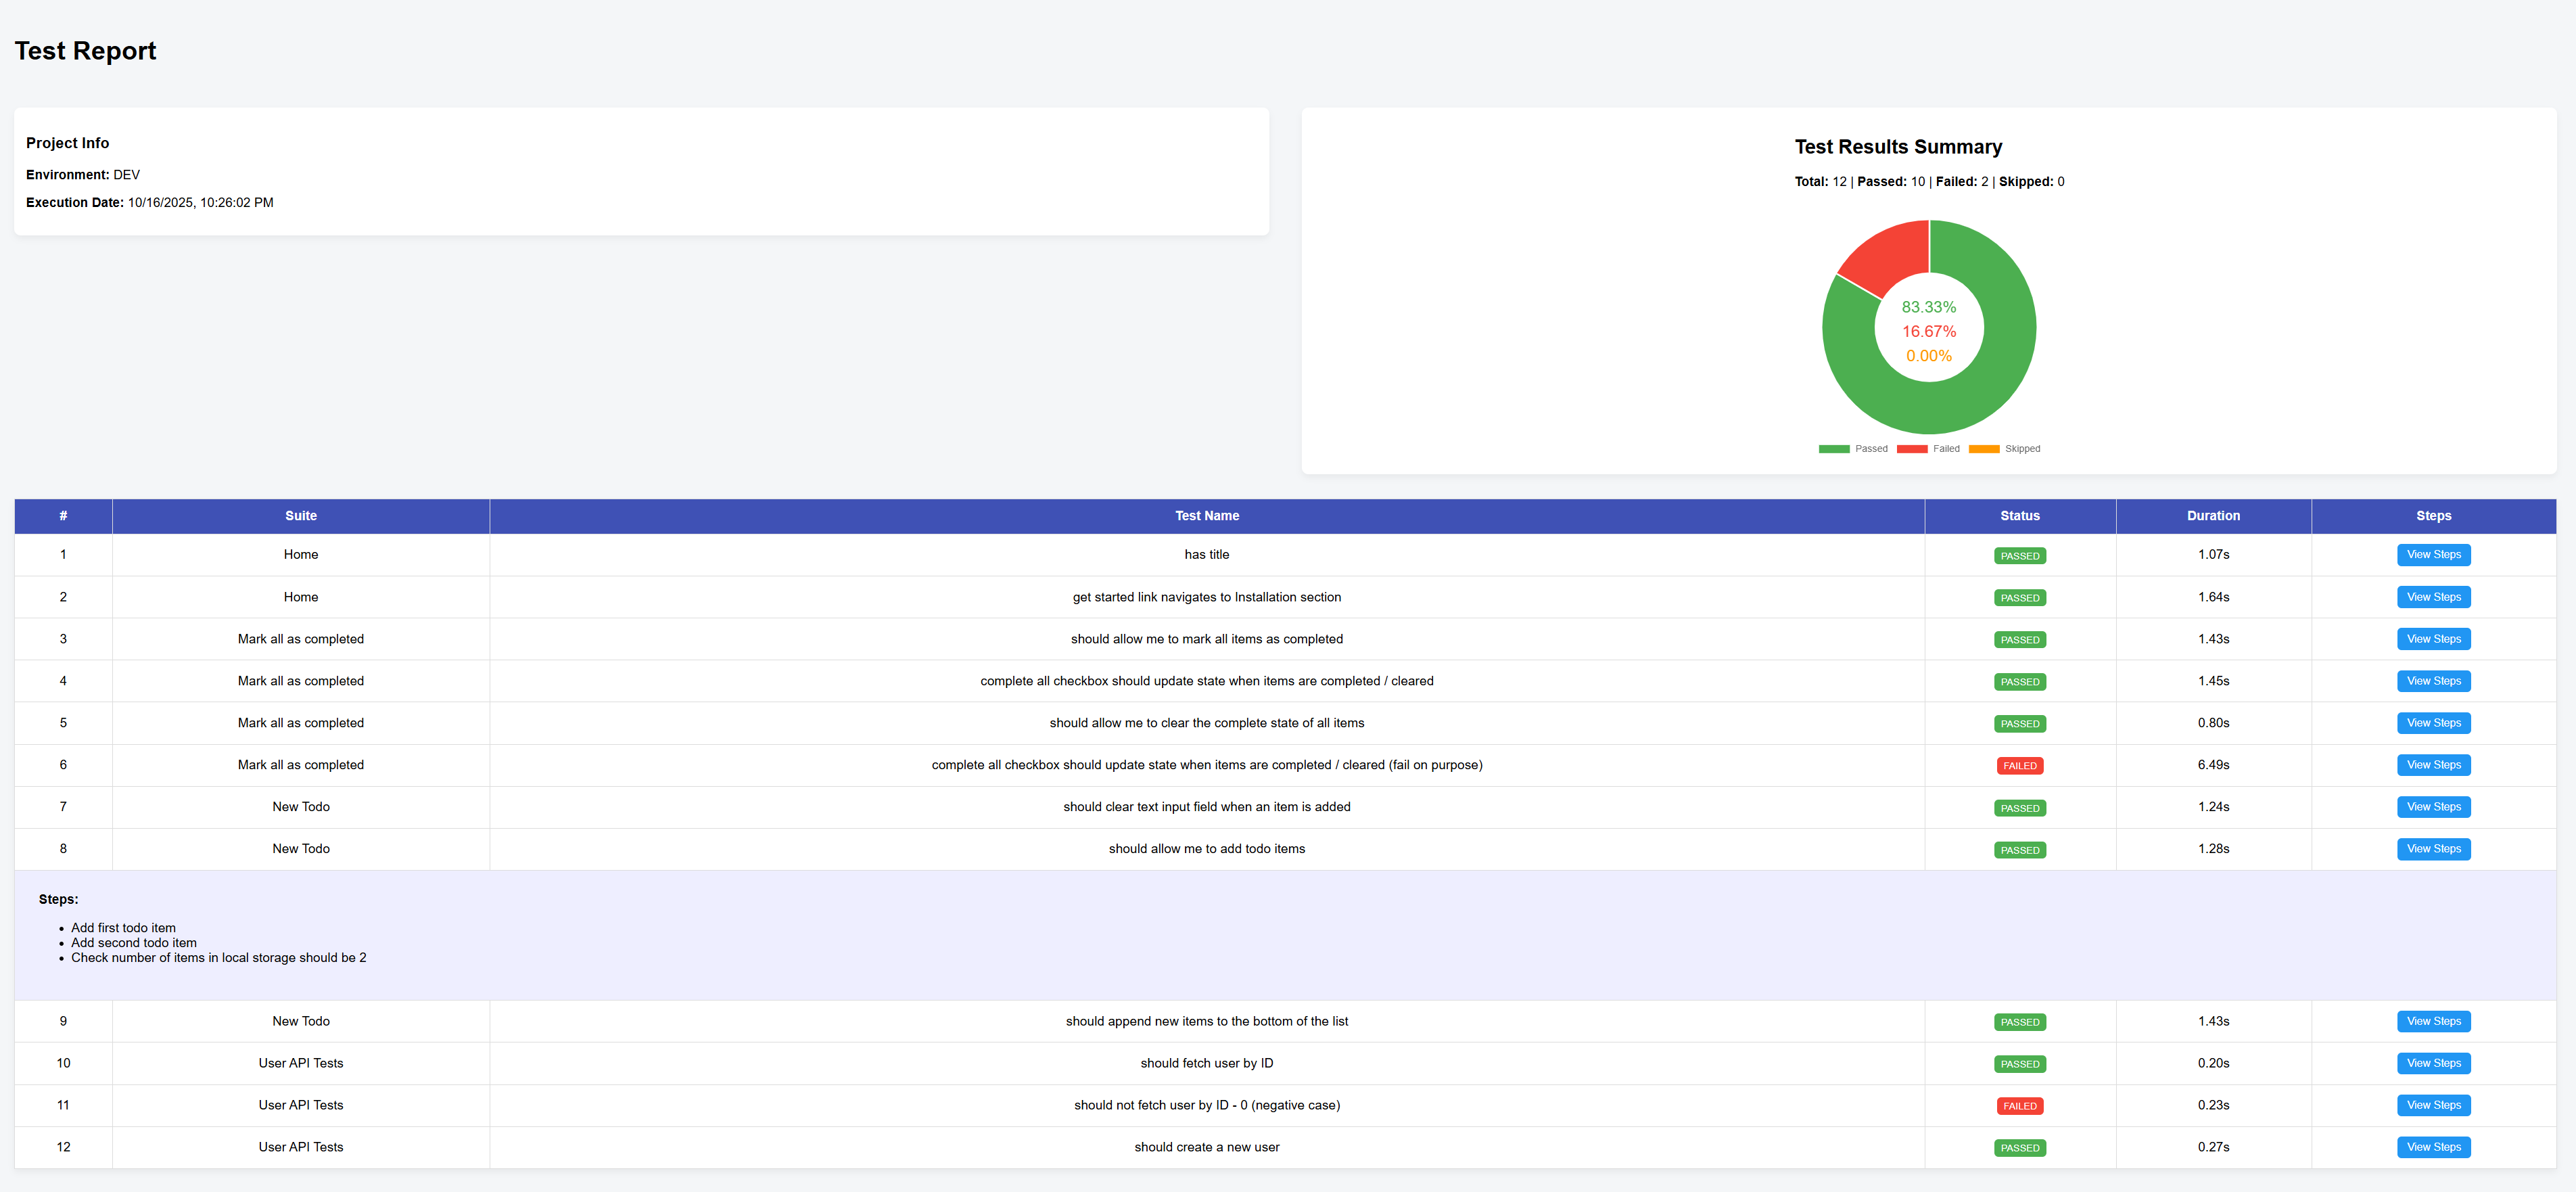
Custom HTML Reporting
File: utils/custom-reporter.ts implements Playwright Reporter interface:
- Collects test results, steps, durations, artifact paths
- Normalizes failure states
- Generates donut chart (Chart.js) summarizing pass/fail/skipped counts with inline percentages
- Two report modes: simplified (local) & detailed (Jenkins) with JIRA action buttons
- One-click “Create Bug” opens pre-filled JIRA issue creation screen via URL parameters (requires valid
JIRA_PROJECT_ID,JIRA_PROJECT_ISSUE_TYPE_ID,JIRA_API_BASE_URLvalues inconfiguration.ts) - Provides quick link to underlying Playwright report per test (
detailsPath)
Open Reports
npm run test:report:playwright   # Native report
npm run test:report:custom       # Custom report
Custom report screenshots
Jenkins Dashboard
Configure Output Paths
Set environment variables before run:
$env:PLAYWRIGHT_HTML_REPORT_DIR = "reports/playwright-report";
$env:CUSTOM_REPORT_DIR = "reports";
npx playwright test
Jenkins Integration
Pipeline passes Jenkins URLs to reporter so artifact links resolve inside Jenkins UI.
Logging
src/shared/utils/custom-logger.ts writes timestamped log lines to console and to logs/automation.log.
Methods: Logger.info | warn | error | debug
Use inside page objects or helpers for richer step context:
Logger.info(`Creating user id=${id}`);
Rotate / archive logs by adding a post-run step or integrating with a log collector (future enhancement).
Code Quality: Prettier / ESLint / Husky
Prettier
Configured with consistent formatting (printWidth 120, tabs enabled, trailing commas). Run:
npm run prettier          # Check
npm run prettier:fix      # Auto-fix
ESLint
TypeScript rules + Prettier integration; warnings for unused vars & any.
npm run eslint
npm run eslint:fix
Husky + lint-staged
npm run setup triggers prepare script -> installs Husky. On commit, staged JS/TS files are auto formatted & linted (lint-staged config in package.json).
TypeScript Configuration
Strict settings in tsconfig.json ensure type safety. Key options:
strict: true,noImplicitAny: truebaseUrl: "./"for simpler non-relative imports- Current path mapping:
"*": ["./src/*"](If you want alias like@utils/*, extend:
"paths": {"@utils/*": ["utils/*"], "@shared/*": ["src/shared/*"] }
Re-run IDE TS server after changes.
CI/CD Jenkins Pipeline
Jenkinsfile shows a Docker-based pipeline using official Playwright image:
- Clean workspace safely inside ephemeral Alpine container
- Checkout repo
- Install dependencies + browsers in Playwright container
- Inject credentials (URL, USERNAME, PASSWORD) if configured in Jenkins
- Run tests with environment variables for reporter paths & Jenkins artifact URLs
- Publish custom HTML report via
publishHTML
Adjust: PLAYWRIGHT_IMAGE version, add parallel stages, archive reports/.
Running Locally in Docker (Example Idea)
docker run --rm -v "$PWD":/app -w /app mcr.microsoft.com/playwright:v1.56.0-noble bash -c "npm ci && npx playwright test"
Writing & Extending Tests
Structure
- Place UI specs under
src/tests/uiand use fixtures for page object provisioning. - Place API specs under
src/tests/api. - Create
src/tests/e2efor cross-cutting journeys (login + multi-page flows).
Best Practices
| Practice | Rationale |
|---|---|
| Use page object methods | Avoid selector duplication |
Wrap logical actions in test.step |
Better reporting & trace readability |
| Tag tests meaningfully | Enables selective, faster suites over time |
| Keep mock data small & realistic | Easier maintenance, fewer flaky assumptions |
| Avoid sleeps; rely on expectations | Deterministic & resilient |
Adding E2E
- Create pages for all involved UI flows
- Add fixture that logs in / seeds data
- Write scenario spec & apply
@regressiontag
AI Agent & Playwright MCP Integration
This project is enhanced with AI-driven test assistance through the Model Context Protocol (MCP) and specialized Playwright-focused agents. These agents help you plan test coverage, generate new browser tests, and heal failing tests directly from within a connected MCP client (e.g., VS Code with MCP-enabled assistant).
What Is MCP?
The Model Context Protocol (MCP) is an open protocol that lets AI assistants connect to external tools ("servers") in a secure, structured way. In this project, MCP servers expose Playwright automation tools so AI agents can:
- Inspect pages and capture DOM snapshots
- Generate locators and test code
- Run tests and analyze failures
- Expose structured test intelligence (failures, summaries, plans) to healing agents
Architecture
The full agentic QA loop runs as a pipeline coordinated by the Orchestrator agent:
flowchart TD
    URL([Target URL]) --> ORC

    subgraph ORC["Orchestrator Agent"]
        direction TB
        P["Phase 1: Plan\nplanner_setup_page\nplanner_save_plan"]
        G["Phase 2: Generate\ngenerator_setup_page\ngenerator_write_test"]
        E["Phase 3: Execute\ntest_run"]
        H["Phase 4: Heal\ntest_debug\nbrowser_generate_locator"]
        R["Phase 5: Report\nget_test_summary"]

        P --> G --> E --> H --> R
    end

    subgraph MCP1["playwright-test MCP server\n(npx playwright run-test-mcp-server)"]
        T1["browser_* tools"]
        T2["planner_setup_page / planner_save_plan"]
        T3["generator_setup_page / generator_write_test"]
        T4["test_run / test_debug / test_list"]
    end

    subgraph MCP2["playwright-qa MCP server\n(mcp-server/index.ts — custom)"]
        T5["get_test_failures"]
        T6["get_test_summary"]
        T7["read_test_plan"]
        T8["list_generated_tests"]
    end

    ORC -->|uses| MCP1
    ORC -->|uses| MCP2
    E -->|writes| RESULTS["test-results/results.json"]
    RESULTS -->|read by| T5
    RESULTS -->|read by| T6
    P -->|saves| PLAN["specs/*.md"]
    PLAN -->|read by| T7
    G -->|writes| TESTS["src/tests/ui/generated/*.spec.ts"]
    TESTS -->|read by| T8
    TESTS -->|listed by| CI["CI: validate:generated\n→ build.yml"]
Governance & Maintenance
As this agent architecture grows, maintaining consistency is critical. Three documents govern the system:
AGENTS.md— Defines each agent's role, enforced conventions, startup sequence, and how to add new agents without creating conflictsCUSTOM-MCP.md— Documents each custom MCP tool, why it exists, and how to add new tools safelyMAINTENANCE.md— Step-by-step workflows for common tasks: adding agents, adding tools, upgrading Playwright, troubleshooting
Start here if you're extending the system. These docs prevent rule conflicts, tool duplication, and maintenance headaches.
Available AI Agents
Located in .github/agents/. Each agent file defines its tools, model, MCP server bindings, and workflow.
-
Orchestrator Agent (
playwright-test-orchestrator.agent.md)- Purpose: Runs the full Plan → Generate → Execute → Heal → Report pipeline autonomously.
- When to use: "Run the full QA pipeline for https://app.example.com" — end-to-end with no manual steps.
- Tools: Combined toolset of all three specialist agents plus the custom
playwright-qaMCP server.
-
Planner Agent (
playwright-test-planner.agent.md)- Purpose: Explore a live web app and produce a structured test plan in
specs/. - When to use: Mapping coverage for a new feature or app before writing any tests.
- Output:
specs/<app-name>-test-plan.mdwith numbered scenarios, steps, and expected outcomes.
- Purpose: Explore a live web app and produce a structured test plan in
-
Generator Agent (
playwright-test-generator.agent.md)- Purpose: Turn a test plan scenario into a Playwright
.spec.tsfile. - When to use: After a plan exists — invoke per scenario to produce
src/tests/ui/generated/files. - Output: Type-safe spec files tagged
// @generated bywith step-level comments.
- Purpose: Turn a test plan scenario into a Playwright
-
Healer Agent (
playwright-test-healer.agent.md)- Purpose: Debug and fix failing tests by replaying them and patching selectors or assertions.
- When to use: After a test run produces failures — point the agent at the broken spec.
- Tooling: Uses
get_test_failuresfrom the custom MCP server for instant structured failure context.
Which Agent Should I Use?
Use this quick guide when choosing among the repo-defined agents in .github/agents/.
| Goal | Choose this agent | Typical input |
|---|---|---|
| Create a new test plan from requirements or a live app | playwright-test-planner |
App URL, requirements file, or pasted requirements |
| Turn an existing scenario into a Playwright spec | playwright-test-generator |
Plan file path, scenario name, output file path |
| Debug and patch a failing test | playwright-test-healer |
Failing spec path or failing scenario |
| Run the full plan → generate → execute → heal flow | playwright-test-orchestrator |
App URL plus requirements source |
Sample Prompts By Agent
Planner Agent
Use playwright-test-planner when coverage needs to be defined before tests are written.
Create a Playwright test plan for Jira ticket PROJ-123.
Create a test plan for TodoMVC using requirements/todomvc-requirements.md.
Create a Playwright test plan for https://www.saucedemo.com/.
Requirements:
- Standard user can log in
- Locked out user sees an error
- User can add and remove items from cart
- User can complete checkout
Include smoke vs regression recommendations.
Generator Agent
Use playwright-test-generator when a scenario already exists and you want an executable .spec.ts file.
Generate a Playwright test from specs/todomvc-test-plan.md for scenario "Add Valid Todo".
Generate a Playwright test with:
<test-suite>Adding New Todos</test-suite>
<test-name>Add Valid Todo</test-name>
<test-file>src/tests/ui/generated/add-valid-todo.spec.ts</test-file>
<seed-file>src/seed.spec.ts</seed-file>
<body>
1. Add a single todo item
2. Verify it appears in the list
3. Verify the input is cleared
</body>
Healer Agent
Use playwright-test-healer when a spec exists but fails and you want the smallest viable repair.
Heal the failing test src/tests/ui/generated/add-todo.spec.ts.
Run it, diagnose the failure, and apply the smallest selector or timing fix.
Do not change the assertion intent.
Debug and heal all failing generated Todo UI tests.
Only make locator or timing fixes.
If app behavior changed, mark the test fixme with a clear reason instead of rewriting expectations.
Debug src/tests/ui/generated/complete-todo.spec.ts.
If the app behavior changed instead of the locator, mark the test fixme with a clear explanation.
Orchestrator Agent
Use playwright-test-orchestrator when you want the full workflow with review checkpoints between phases.
Generate tests for requirements/todomvc-requirements.md using the full QA pipeline.
Run the full Playwright QA pipeline for Saucedemo.
Requirements:
- Standard user login
- Locked out user login failure
- Add item to cart
- Remove item from cart
- Complete checkout
Run the full QA pipeline for https://demo.playwright.dev/todomvc/ using:
REQ-001 User can add a todo item
REQ-002 User can complete a todo item
REQ-003 Active count updates correctly
REQ-004 Filter links work
Run the full QA pipeline for PROJ-123.
Use the ticket as the requirements source and stop at each checkpoint for approval.
Prompt Writing Tips
The most reliable prompts usually include:
- The app or feature name.
- The requirements source or plan file path.
- The exact scenario or section name when generating.
- The target output path when generating tests.
- Any limits such as "only selector fixes" or "focus on smoke scenarios".
Agent Rules vs User Prompts
Agent files define the permanent rules for how each workflow should behave. User prompts should mainly define the scope of a particular run.
- Put permanent behavior in agent rules: fixture usage, page object usage,
test.step()requirements, healing limits, review checkpoints, and disallowed APIs. - Put run-specific intent in prompts: app URL, requirements source, plan file path, scenario name, output path, and scope limits.
- Repeat a rule in the prompt only when you want a stricter run-specific constraint such as "only fix selectors and timing" or "focus on smoke scenarios only".
If a user prompt conflicts with an agent rule, the agent rule should win. For example:
- If a prompt asks the generator to use raw
pagelocators, the generator should still use fixtures and page objects. - If a prompt asks the healer to change the assertion intent, the healer should avoid that and instead mark the test appropriately when behavior changed.
In practice, the safest prompts describe the input, target scope, and desired output, while leaving stable project policy to the agent definitions.
Custom MCP Server (mcp-server/)
This project ships a purpose-built MCP server that bridges Playwright test results with the agent layer.
| Tool | What it does | Why not use built-in tools? |
|---|---|---|
get_test_failures |
Reads test-results/results.json → structured failure data: file, line, error, failed step, screenshot path |
test_run returns raw ANSI terminal output. This gives the healer clean, targeted JSON it can act on without parsing noise |
normalize_requirements |
Normalizes Jira/file/pasted requirements text into one canonical JSON contract | Built-in tools do not provide project-specific requirements parsing and normalization |
Build and start the server:
npm run mcp:build   # installs deps and compiles mcp-server/
npm run mcp:start   # runs node mcp-server/dist/index.js
How the Integration Works
- MCP Configuration: .vscode/mcp.json registers three servers:
@playwright/mcp,playwright run-test-mcp-server, and the localplaywright-qacustom server. - Tool Exposure: The Playwright test MCP server exposes browser automation and test lifecycle tools. The custom server exposes intelligence tools that read test artefacts.
- Agent Logic: Each
.agent.mdfile in.github/agents/defines the agent's toolset, system prompt, and workflow. The Orchestrator chains all four phases. - Test Lifecycle Tie-In: Generated tests land in
src/tests/ui/generated/following POM patterns. Thevalidate:generatedscript enforces quality standards before CI merge.
Folder & File References
- DEMO.md → Start here for the talk. Full demo walkthrough: architecture, live demo steps, blueprint pattern, best practices.
- .github/agents/ → All four agent definitions.
- .vscode/mcp.json → Registers all three MCP servers.
- mcp-server/index.ts → Custom QA MCP server —
get_test_failures,normalize_requirements. - requirements/ → Versioned requirement files (REQ-NNN format). Parsed and normalized by
normalize_requirements. - specs/ → Test plans produced by the Planner agent.
- src/tests/ui/generated/ → 5 agent-generated tests with
// req:traceability headers. - src/tests/ui/self-healing-demo.spec.ts → Side-by-side brittle (
test.fixme) vs healed tests. - utils/validate-generated-tests.ts → Quality gate: 10 rules + REQ coverage check.
Typical Workflows
1. Planning New Coverage
Prompt: "List regression test scenarios for the dashboard at https://app.example.com/dashboard" Agent Flow:
- Planner navigates to URL
- Enumerates key modules (e.g., charts, filters, export buttons)
- Outputs structured test plan grouped by priority & tags (
@smoke,@regression)
2. Generating a New Test
Prompt: "Create a Playwright test that logs in with user [email protected] / Pass123 and verifies the avatar displays" Agent Flow:
- Opens login page via MCP tool
- Captures selectors for email, password, submit, avatar
- Generates a spec file (e.g.,
src/tests/ui/login-avatar.spec.ts) using existingpages/uiabstractions if present (or scaffolds minimal inline selectors if not) - Optionally runs test, returns status and patch if adjustments needed
3. Healing a Failing Test
Prompt: "Fix the failing test in todo.spec.ts"
Agent Flow:
- Reads failure stack & screenshot via MCP attachments
- Replays steps, identifies selector mismatch (e.g.,
#todo-inputchanged to[data-test="todo-input"]) - Suggests patch (or applies if auto-fix mode allowed)
- Re-runs test; if stable, reports fix summary
Security & Safety Considerations
- Agents operate only on files inside the workspace (no external code injection).
- MCP tool calls are auditable; each action is explicit.
- Test code changes should be reviewed via version control (commit diffs) before merging.
Extending the Agent System
You can add new specialized agents (e.g., accessibility auditor, visual regression agent) by:
- Creating a new agent file under
.github/agents/(e.g.,playwright-accessibility-agent.agent.md). - Declaring the tools, model, and system prompt in the frontmatter + body.
- Adding any new MCP tools to
mcp-server/index.tsand rebuilding withnpm run mcp:build. - (Optional) Adding custom Playwright helpers in
src/shared/utilsto standardize metrics or assertions.
Adding Custom MCP Servers
Extend .vscode/mcp.json with new server entries following the existing pattern. The playwright-qa server in mcp-server/ is a working reference implementation — copy its structure to expose new tools (e.g., Jira integration, analytics, visual diff).
Benefits
- Faster test authoring from natural language.
- Reduced flakiness via automated healing suggestions.
- Structured planning to avoid coverage gaps.
- Consistent adherence to project POM & naming conventions.
Troubleshooting
| Issue | Possible Cause | Resolution |
|---|---|---|
| Agent doesn't see pages | Page not publicly reachable or auth required | Provide test credentials or open tunnel; ensure login flow described |
| Generated selector unstable | Dynamic attribute chosen | Ask agent to regenerate using data-test attributes or nth-match fallback |
| Healer cannot patch test | Test uses outdated helper abstraction | Refactor page object; re-run healer to map stable locators |
| MCP server not loading | Missing MCP-enabled client | Ensure you are using a tool or extension that supports .vscode/mcp.json |
Quick Start (Conceptual)
- Open an MCP-enabled chat interface in VS Code.
- Ask: "Plan tests for the todo feature" → Receive structured plan.
- Ask: "Generate tests for the highest priority scenarios" → Receive spec files.
- Run with
npm run test/npm run test:custom. - If a test fails,
No comments yet
Be the first to share your take.